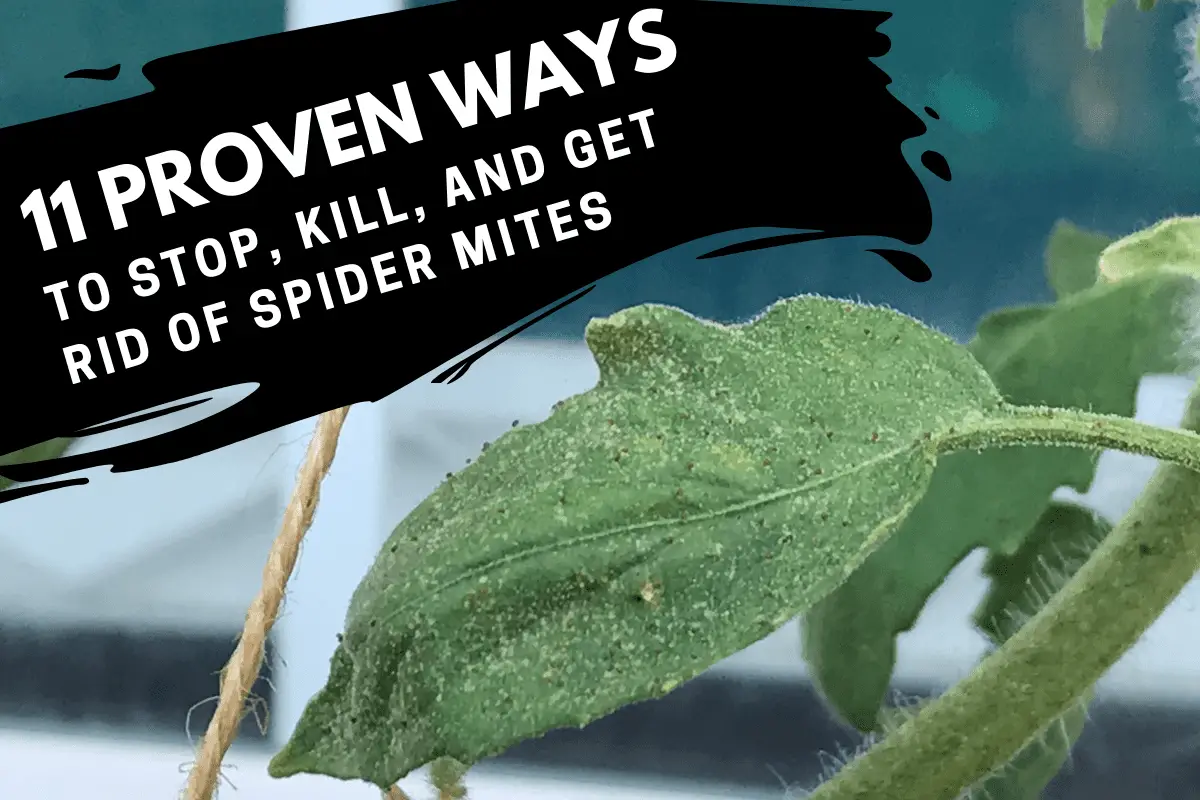
11 Proven Ways to Stop, Kill, and Get Rid of Spider Mites
I’ve been gardening for 10+ years, and in all that time, there are few pests that annoy me as much as spider mites.
They arrive unnoticed, reproduce exponentially, drain plants of their cellular juices, and spin wispy webs in order to hitch a ride to other corners of your property (and beyond). One week, your garden’s looking great. A few weeks later, your plants might be yellowing, drying up, or in various stages of decline.
After being on the losing end of several spider mite infestations, I began to look for effective, tried-and-true ways to stop, kill, and get rid of these seemingly unavoidable pests.
The most reliable and cost-effective way to kill spider mites is to create simple yet powerful homemade insecticidal sprays–using organic products such as neem oil, soapy water, liquid seaweed, garlic, essential oils, or molasses–and to treat plants thoroughly and regularly for several weeks.
Disclosure: This post may contain affiliate links to some of my favorite products found on Amazon and other retail sites. I’ll earn a small commission from purchases made through those links, at no additional cost to you. Please read my product disclosure page to learn about the care I take when recommending products to my readers.
Concentrates, ready-made products, and natural predators (such as lacewings, ladybugs, and predatory mites) are also excellent, albeit typically more expensive, spider mite killers.
Chemical sprays and miticides will repel and kill spider mites too, but you take a risk when using such products. On the one hand, you could end up unknowingly killing pollinators, beneficial insects, and other natural predators. On the other hand, you might contribute–in very small but important ways–to the process whereby spider mites develop a natural tolerance for insecticidal and miticidal products.
If, like me, you like to solve problems by first searching online for answers, you’re going to find a lot of information when it comes to the best spider mite treatments. In fact, I’ve written extensively about spider mites–what they look like, where they come from, and how they spread–in an effort to help fellow gardeners stave off these near-microscopic nuisances.
What you won’t find–as far as I can tell–is a comprehensive list of steps you can take to deter, repel, and destroy spider mites.
Here’s how I think of it: What works well for one person in one corner of the world isn’t necessarily going to work well for another person in a different corner of the world.
So here’s what I’ve done. I’ve divided the article into 2 main parts:
- Preferred Treatments: These are my favorite approaches to killing spider mites, ranked in order of efficacy, cost-effectiveness, and ease.
- Additional Treatments: These might be effective, under certain circumstances, but I don’t practice or recommend them, which is why they aren’t included in my official list. However, I want you to be fully informed, so I’ve added short descriptions about each below for your convenience.
Simply put, pick one of the 11 options noted below, buy the relevant products, follow the directions, and see how things go.
And here’s the good news: If things don’t go exactly as you hoped they would, you’ve got 10 more options to try!
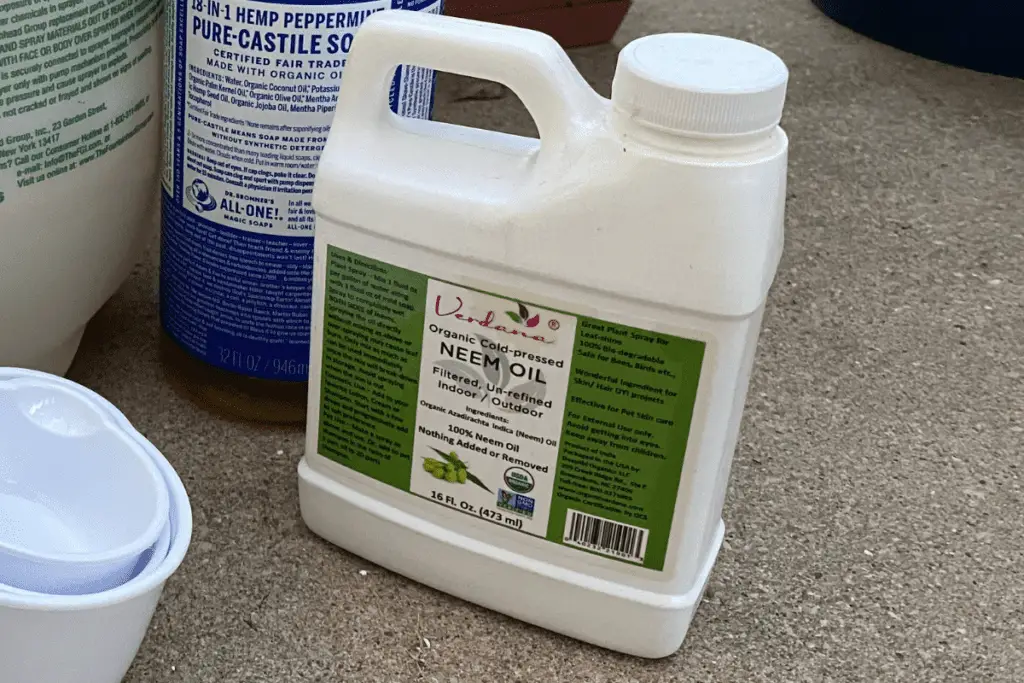
1. Neem Oil Spray
When mixed with water and a soapy emulsifier, neem oil will coat spider mites in a thin layer of oil, killing them quickly. In fact, neem oil is particularly effective since it contains the chemical compound azadirachtin, which wreaks havoc on spider mites’ hormonal systems.
For those of you who value time and convenience, you can buy pre-made neem oil sprays on Amazon or at your local box stores or garden centers. Three great options are Captain Jack’s Neem Oil, Natria Neem Oil Spray, and Safer Neem Oil Ready to Use. For small infestations, these will work just fine.
But for larger infestations–or for those of you who want to save money and don’t mind mixing your own neem oil spray–I recommend purchasing concentrated neem oil products such as Verdana Neem Oil or Neem Bliss Neem Oil since these will last much longer than the pre-made options and will allow you to mix gallons’ worth of neem oil spray throughout the growing season.
As with any oil, you’ll need an emulsifying agent to make sure the neem oil and water mix thoroughly, so please don’t forget this step. I’ve written a detailed step-by-step guide to killing spider mites with neem oil, but here’s a quick overview.:
- For 16-ounce bottles, which I use on indoor plants, I add ¾ teaspoon of neem oil and ½ teaspoon of good castile soap, organic dish soap, or insecticidal soap, then fill the bottle with water and shake thoroughly.
- For 1-gallon sprayers, which I use on my outdoor plants, I use roughly the same ratio as above, adding 2 tablespoons of neem oil and 1 tablespoon of emulsifier before adding water and shaking. If I were a perfectionist, I would add 1 ⅓ tablespoons of soap to maintain the ratio noted earlier, but I find that 1 tablespoon works just fine.
- For 2-gallon sprayers, I pour 4 tablespoons of neem oil and 2 tablespoons of soap before adding water and shaking.
If you’d like to know more about how to maximize the effectiveness of your neem oil spray, check out my detailed treatment plan and my complete guide to neem oil.
2. Garrett Juice Spray
Here’s the thing to know about Garrett Juice. It’s not a product per se but a recipe for a particular type of foliar fertilizer originally developed by Howard Garrett (a.k.a. the “Dirt Doctor”). Like many gardeners, Garrett was fertilizing his plants with a compost tea spray when he learned about the horticultural benefits of liquid seaweed. He added molasses to the mix and included vinegar as well to lower the pH level and increase the overall effectiveness of the formula.
If you have a compost pile at home–and the ability to make compost tea–you can create your own homemade Garrett Juice by combining the following ingredients:
- 1 gallon of water
- 1 cup compost tea
- 1 ounce liquid seaweed
- 1 ounce liquid molasses
- 1 ounce apple cider vinegar
But for those who can’t make their own compost teas, Garrett Juice can be purchased online from the Medina company:
- Medina Garrett Juice Plus: This product is a bit pricey, but wow, it’s filled with all kinds of good stuff for your plants! Its N-P-K ratio is 1.1-2.2-1.5, which means you’re getting just enough nitrogen, phosphorous, and potassium to help your plants grow well without the chance of burning their root systems if you accidentally apply too much one day (which can happen if you’re using stronger fertilizers.)
What makes Garrett Juice one of my preferred spider mite killers is that it does double duty: it kills spider mites while also fertilizing your plants. Healthy plants are the #1 deterrent against spider mites, so Garrett Juice is one of the best options out there for fighting spider mite infestations.
3. Soap Spray
This is another of my favorite spider mite deterrents because soapy sprays are easy to make and highly cost-effective. As long as you use the right soaps, they can be applied day after day until your garden is free of spider mites.
I recommend using one of three types of soap for your spray: a castile soap, an organic liquid soap, or an insecticidal soap. I’ve used all three, and I honestly can’t tell any difference in terms of the results. Each soapy spray seems to work just as well as the next.
These are my preferred brands for each type of soap:
- Castile Soap: Dr. Bronner’s Peppermint Pure Castile Soap
- Liquid Soap: Mrs. Meyer’s Clean Day Dish Soap
- Insecticidal Soap: Safer Insect Killing Soap
I’ve recently grown quite fond of Dr. Bronner’s castile soap since it’s made with essential oils and mint oil from the mentha avensis plant (which purportedly has anti-mosquito and larvicidal properties as well).
To make the spray, I simply add water to a 1- or 2-gallon sprayer, then add 5 tablespoons of soap per gallon. This might seem like a lot of soap at first glance, but the goal is to create a powerful soapy spray, not a watered-down version. Since soap is your primary ingredient, you need to make sure that you’ve included enough so that your spray will cover spider mites in soapy residue.
Please note: Be sure to add the water first or else you’re going to create a foamy mess once you begin pouring water into your sprayer.
All in all, it only takes 5 minutes or so to make a good soapy spray, so literally anyone can do it!
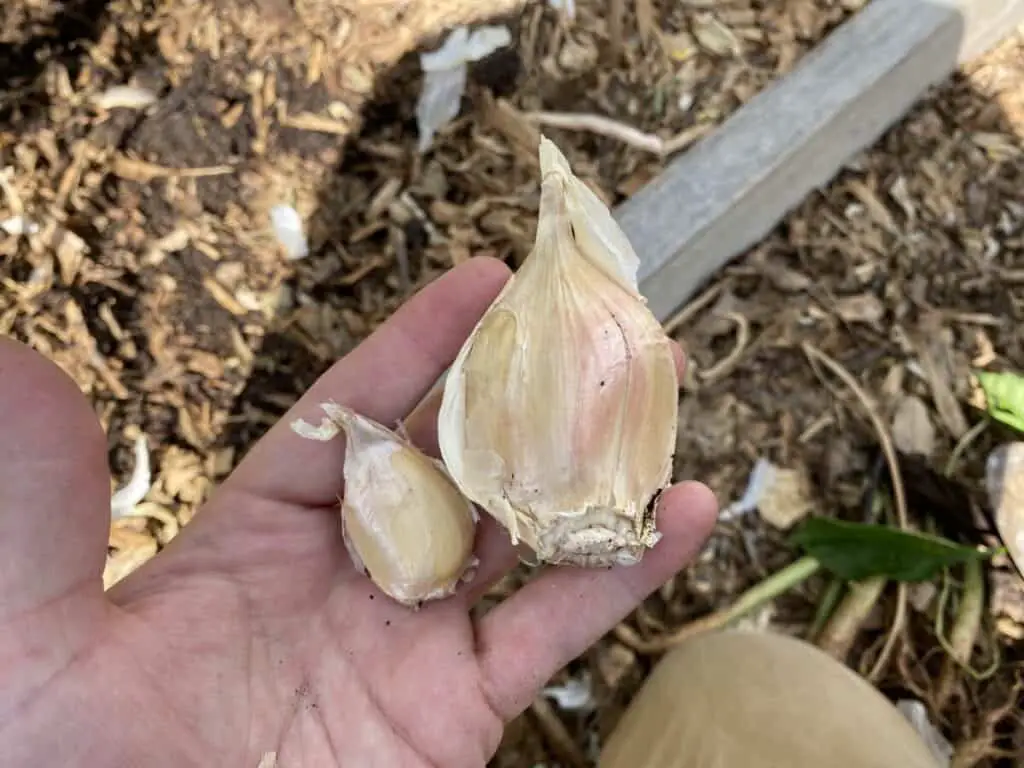
4. Garlic Spray
Garlic isn’t usually the first option I turn to for spider mite infestations, but it can be quite effective if mixed properly and used regularly. You can find numerous recipes online, but I have one that’s a favorite of mine.
It’s a garlic-mint combination spray, and it’s definitely the cheapest way to combat spider mite infestations. I have the folks over at An Oregon Cottage to thank for sharing their recipe.
Personally, I have a strong preference for neem oil when it comes to fighting spider mites, but if I’m ever out of neem and in need of a great substitute, I’ll use this garlic-mint option.
Here’s how it’s made:
- Combine two heads of garlic (cloves separated and peeled) with 3 cups of mint leaves. Blend the garlic and mint together for a few seconds, then pour the mixture into a large pot. If you don’t have mint handy, you can substitute mint oil in its place.
- Add 2 teaspoons of cayenne pepper, 1 teaspoon of liquid soap, and 12 cups of water. Stir thoroughly, then boil the mixture for 3-4 minutes, and let it sit overnight to cool.
- Strain and pour the liquid into a reusable spray bottle. You can save the rest by pouring it into an old milk jug that’s been thoroughly washed or any other clean container.
5. Liquid Seaweed Spray
Often referred to as “liquid kelp”—named after a particularly robust type of seaweed that can grow anywhere from 100-250 feet long—liquid seaweed is a great addition to the garden. Much like Garrett Juice, it kills spider mites on contact while also fertilizing your plants.
If you look at a bottle of liquid seaweed, you’ll see a ratio on the front, typically 0-0-1 or .3-.2-1. This is known as the N-P-K ratio and signals what percentage of nitrogen (N), phosphorus (P), and potassium (K) the product contains. If you’ve ever purchased fertilizer products, you’ve likely noticed that their N-P-K percentages are typically higher than those of liquid seaweed. This doesn’t mean that liquid seaweed is less effective than other fertilizers. It simply signals that liquid seaweed is going to help your plants via other mechanisms.
For example, kelp plants contain a wide variety of nutrients, and as the folks at Herbs at Home have noted, kelp-based fertilizers leach less than their commercial counterparts. What this means is that the microorganisms found in liquid seaweed allow nutrients to bind more readily to soil particles and thus remain in the soil instead of getting washed out during repeated watering or rainfall.
But what makes liquid seaweed an excellent choice for the home gardener is that plants will readily absorb its nutrients through their foliage, unlike fish emulsion and other fertilizers that are typically applied to the soil. This direct uptake strengthens the plant’s natural defenses, contributing to the overall health of the plant and improving its ability to resist spider mites naturally.
There are several great options to choose from when it comes to liquid seaweed. A few of the better ones are:
- Blue Planet Nutrients Liquid Seaweed
- GS Plant Food Organic Liquid Kelp
- Maxicrop Liquid Seaweed
- Medina Liquid Seaweed
6. Essential Oils Spray
If you search online for an essential oils bug spray, you’re going to find lots of articles showing you how to create your own bug and mosquito repellent. But essential oils are also effective at killing spider mites because, like neem oil, they coat spider mites in a thin layer of oil that interrupts the insects’ biological and reproductive processes.
Some of the most popular and readily available essential oils include: basil, cedarwood, chamomile, citronella, coriander eucalyptus, lavender, lemon, lemongrass, lime, orange, peppermint, rosemary, sage, spearmint, and thyme.
There are many ways to make an essential oils spray, but the three primary ingredients are: 1) an essential oil, 2) a soapy emulsifier, and 3) water. You must add an emulsifying agent (i.e. soap) in order to ensure that the essential oils mix well with the water. Otherwise, those two ingredients will separate in the bottle, and your spray will be largely ineffective.
Here’s my recipe for creating your own spider mite spray using essential oils and a small, 16-ounce spray bottle:
- ¾ teaspoon essential oil. You can mix oil types if you’d like to do so.
- 1 teaspoon castile soap, organic dish soap, or insecticidal soap. This will allow your oil and water to mix properly.
- 16 ounces of water.
Some people recommend 1 teaspoon of essential oil per 16 ounces of water, but I’ve found that ¾ of a teaspoon works just fine, and you’ll get much bang for your buck. For instance, if you purchase a 4-ounce bottle of essential oil, that’ll give you roughly 24 teaspoons’ worth. That means you can make up to 24 bottles if you’re using 1 teaspoon per bottle. But if you use ¾ teaspoon instead, you can make 32 bottles with 4 ounces of essential oil. That means your essential oil will last 25% longer using this approach (which seems like a no-brainer to me!).
Just so you know, 16-ounce bottles of essential oil are cheaper, sometimes much cheaper, per fluid ounce than the smaller 4-ounce bottles.
Here are a few go-to essential oils for those interested in making a cost-effective spray:
- Basil Essential Oil
- Lavender Essential Oil
- Peppermint Essential Oil
- Rosemary Essential Oil
- Spearmint Essential Oil
And if you’re #1 concern has to do with ease and convenience, you can simply pick up a bottle of Dr. Earth Final Stop: Vegetable Garden Insect Killer. It’s an effective oil-based spray made of cinnamon oil, garlic oil, peppermint oil, rosemary oil, sesame oil, and thyme oil.
However, if you’ve got a large spider mite infestation (i.e. spider mites on numerous plants), I’d suggest avoiding the ready-made products and mixing up your own oily foliar spray since that’s a much more cost-effective way to stop serious infestations.

7. Companion Planting
People who talk about companion planting typically discuss the beneficial side effects that certain plants have on their companions as well as the negative side effects that occur when varieties that shouldn’t be planted next to each other end up next to each other (like tomatoes and members of the Brassica family).
But companion planting can also increase the overall health of your garden by warding off garden pests while attracting helpful insect predators. Spider mites are known for the many plants they’ll attack, but there are also many plants that resist and repel them as well as those that serve as decoy, trap crops.
If you’re a careful planner, you can design garden beds that have plants that spider mites like interspersed with plants they tend to avoid. That way, you will minimize the risks of a total infestation while also creating natural buffer zones between plants that typically attract spider mites.
Doing so will lead to smaller infestations overall, which will make a huge difference once you begin treating your plants for spider mites.
8. Liquid Molasses Spray
When people think of molasses, they tend to think of the dark, gooey substance produced from refined sugarcane (which is definitely not something you’d want to coat your plants with!).
Liquid molasses, on the other hand, is a great addition to your arsenal of insect-repellent sprays. It’s an organic product, it kills spider mites quickly, and it’s derived from sugar, which means that it’ll benefit both your plants’ foliage as well as the microbial life in your soil.
It’s even great for compost piles since it nourishes the microbes that are breaking down the organic materials you’ve stored there.
To make a liquid molasses insecticidal spray, simply mix 1-2 tablespoons of liquid molasses per gallon of water. For a small infestation, you can mix ½ to ¾ teaspoon of liquid molasses in a 16-ounce reusable bottle for use on both indoor and outdoor plants.
Like other foliar sprays, liquid molasses will need to be reapplied frequently to ensure that you’ve killed all of the pests in your garden. If you plan to use liquid molasses, I recommend alternating between an insecticidal soap spray (applied every day for six straight days) and the liquid molasses spray (applied on the seventh day). This way, you’re not overdoing it with the molasses while also ensuring that the spider mites don’t have a chance to regroup and continue reproducing.
I recommend these popular options if you’re interested in mixing up a batch of liquid molasses spray:
And just so you know, this product is sometimes referred to as “horticultural molasses,” but rest assured, it’s liquid molasses all the same.
9. Pyrethrin Spray
Derived from Chrysanthemum flowers, pyrethrins are a series of natural chemical compounds that debilitate, paralyze, and kill most insects that touch or ingest them. To use a pyrethrin spray properly, make sure to follow the directions on the bottle and spray in the late afternoon or early evening to avoid killing beneficial pollinators.
But keep this in mind: Pyrethrins break down quickly, especially when exposed to sunlight. If you’re using a pyrethrin spray to kill spider mites, you’ll have to re-apply once every 4-5 days to ensure proper coverage. You’ll also need to supplement with a foliar fertilizer or soap spray on the off days to kill the spider mites that manage to avoid the pyrethrins.
There are a number of popular pyrethrin products on the market, and any of these will do just fine:
- Bonide Pyrethrin Garden Insect Spray
- PyGanic Gardening Pyrethrin Concentrate
- Southern Ag Natural Pyrethrin Concentrate
10. Spinosad Soap Spray
If you’ve ever used a spinosad spray to kill spider mites, you have soil bacteria to thank for it.
The bacterium Saccharopolyspora spinosa produces chemicals that, when fermented, result in a powerful organic insecticide that kills spider mites, thrips, fleas, fruit flies, and several beetle and caterpillar species.
When garden pests such as spider mites ingest spinosad–either newly sprayed or as a dried residue–they’ll experience nervous system degeneration and die within 24-48 hours.
But here’s what sets spinosad sprays apart from pyrethrins and other foliar sprays: Spinosad residues will remain on the plant’s foliage for up to two weeks, which means that its killing power will continue to work long after you’ve sprayed your plants.
However, please keep two things in mind. First, sunlight will contribute to the molecular breakdown of spinosad, so you’ll likely need to reapply after a week or two, depending on how much sunlight your garden gets. Second, spinosad does not hold up well at all when plants get wet, so if it rains shortly after an application–or if you spray your plants with a garden hose for whatever reason–you’ll likely need to reapply within 5-7 days to ensure maximum effectiveness.
According to the National Pesticide Information Center, spinosad has very low levels of toxicity and is practically harmless to both humans and animals–as well as many beneficial insects–making it a safe option for organic gardeners who are interested in controlling and killing off spider mites and other garden pests.
Please note that spinosad residue can have negative effects on predatory mites but that it poses practically no risk whatsoever to bees and adult butterflies (unless you coat them in spinosad spray). To avoid harming pollinators and other beneficial insects, spray your plants in the early evenings when pollinators are no longer active so that the spinosad has time to dry before the bees and butterflies get to work the following day.
There are a number of effective spinosad sprays on the market. A few of my favorites are:
- Captain Jack’s Dead Bug Brew
- Ferti-Lome Spinosad Lawn and Garden Insect Spray
- Monterey Garden Insect Spray
- Ferti-Lome Natural Garden Spinosad Soap

11. Beneficial Insects
Like companion planting, beneficial insects are key to your garden’s success. But as anyone who’s gardened for any amount of time knows, it can be rather frustrating waiting and hoping for such insects to make an appearance among your plants.
Luckily, there are online retailers who can help this process along by selling you insects, often in their larval stage, that you can release into your garden. The three most popular spider mite killers are:
- Predatory Mites
- Ladybugs
- Lacewings
Of course, there are a few downsides to this approach. First, this is typically a rather expensive approach to pest control. Second, insects released into your garden will not necessarily remain within the confines of your property. You might be thrilled to see ladybugs present one day only to find them entirely missing the next. Finally, the homemade spider mite sprays mentioned can be fatal to both spider mites and their beneficial predators. If you’re not careful, you can kill off good and bad bugs alike.
For predatory mites, I recommend buying yours from Arbico Organics. They sell at least 10 different predatory mite species, and you’ll have plenty of help when it comes to predatory mite selection and release.
When it comes to ladybugs and lacewings, I recommended the Nature’s Good Guy company. You can buy ladybugs in bulk from Amazon (typically 1,500 bugs for under $30), or you can spend a bit more and purchase a Predator Garden Pack that includes ladybugs, lacewing eggs, and beneficial nematodes.
Additional Treatments
I consider the 11 options above to be the most effective ways to rid your property of spider mites, but there are other possibilities as well, ones you’ll see written about if you search the web for any period of time.
Personally, I don’t like these approaches for various reasons, but I thought I’d include them here so that you’d have a complete list of possible treatment methods. I also wanted to make sure you know what’s out there and know why I’m not enthusiastic about each of these treatment methods.
My least favorite methods for killing spider mites are:
Botanigard ES: I’d say this is the best of the bad methods. On the one hand, Botanigard ES is a natural product that kills insects via a parasitic fungus (Beauveria bassiana). On the other hand, it’s way too expensive. If money isn’t an issue for you, then maybe it’s worth a try. Otherwise, stick with one of the cost-effective treatments noted above.
Cyonara: Another expensive product, Cyonara uses pyrethroids (chemical cousins to pyrethrins) to kill spider mites. Will this kill spider mites? Yes. Will this kill lots of other bugs as well, both good and bad ones? Yes. All in all, I prefer cheaper, natural products over chemical insecticides like Cyonara.
Diatomaceous Earth: Diatomaceous Earth is an effective, albeit indiscriminate, insecticidal powder. Unlike some die-hard anti-DE’ers, I’m not against DE. I just don’t think it’s an effective approach to killing spider mites. For this to work, you’d have to completely cover your plants in DE, wasting a lot of product and harming any beneficial pollinators who happen to land on them.
Hydrated Lime: I think there’s a time and place for the use of lime, but spider mites warrant other, better methods. There’s no need to make a hydrated lime spray for this purpose. Use one of the above options instead.
Hydrogen Peroxide: Some people suggest making a hydrogen peroxide spray to kill spider mites, but I don’t understand the appeal, given the better alternatives that exist.
M-Pede Miticide: M-Pede will definitely kill spider mites, but like Botanigard ES, it’s incredibly expensive, and frankly, there are cheaper alternatives out there that are just as effective. My recommendation is to skip this product for something more cost-effective.
Rubbing Alcohol: Please note that rubbing alcohol is only effective on small spider mite infestations, typically localized problems on indoor houseplants. If you take a cotton ball, lightly dip it in rubbing alcohol, and run it along the leaves of the infested plant, the rubbing alcohol will kill any spider mites that come into contact with it. However, I’m not a fan of this method. I’d rather fill a small spray bottle with a soap or essential oil spray and use that instead.
UVB Lamps: I hesitate to mention UVB lamps because 99.9% of people reading this article don’t need them, but researchers have shown that UVB lamps were effective in stopping spider mite infestations of greenhouse-grown strawberries (while also doing no harm to predatory mites). However, unless you specialize in greenhouse-grown fruits and vegetables, you don’t need UVB lamps to rid your plants of spider mites. Just use the methods described above. They’re both easier to use and more affordable overall.
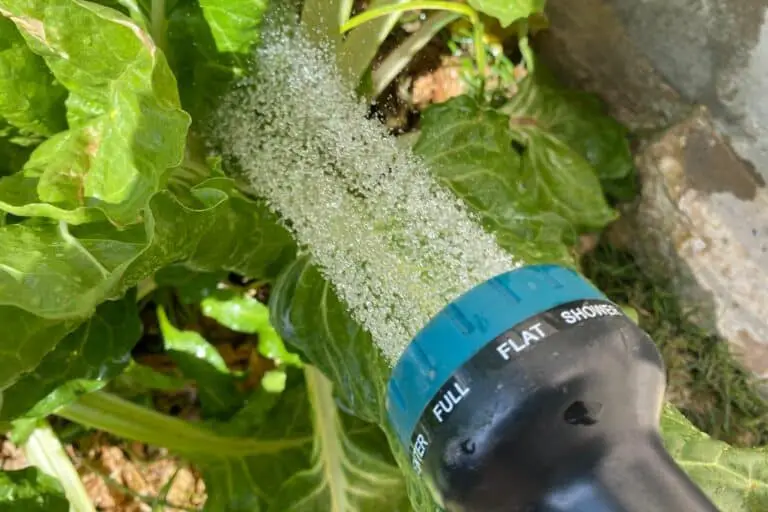
Water: Honestly, I have no idea why so many people tout water as an effective spider mite killer. It makes me wonder if any of them have ever actually tried to stop a spider mite infestation with water. Water might be effective for very minor infestations–for instance, I’ve seen evidence that hardy houseplants can be placed in the shower so that spider mites are rinsed off and flushed down the drain–but spraying your plants with water is largely ineffective. For this to work outside, you’d need to blast the top and bottom of all infested foliage with strong bursts of water to dislodge the spider mites. This is both ineffective and a waste of time and water compared to the many methods noted earlier in this article.
What I’ve proposed above is not a single solution to spider mites but a series of strategies you can try as you deal with spider mite infestations. If one approach doesn’t seem to work after a few weeks, try the next. If the second approach isn’t as effective as you’d hoped, move on to the third.
Simply put, you’re going to have to experiment with different approaches, and you’re going to need to be both consistent and aggressive in your applications. Spider mites are voracious pests who reproduce quickly, so you’ll need to stay on top of things if you hope to stop their spread. If you’d like to read more about my preferred approach to stopping a spider mite infestation, take a look at the week-by-week treatment plan that I use whenever I see signs of spider mites in my garden.