Can Plants Recover from Spider Mites? What You Need to Know
Have you ever had plants in your garden that looked great…until they didn’t. Maybe you noticed clusters of small white dots expanding across your plant’s leaves or even patches of dried or decayed foliage. Maybe, like me when I was a novice gardener, you saw entire plants wiped out in just a few weeks, only to realize too late that they were the victims of a spider mite infestation.
If you’ve ever dealt with spider mites in your garden, you likely know what I’m talking about. You’ve probably even asked yourself, “Can my plants recover from this?”
As someone who’s spent his fair share of time battling spider mites, and learning what works best when it comes to fighting these garden pests, I’ve got some good news for you:
Plants can recover from spider mite infestations if proper time and attention is paid to both treatment and prevention. Removing infested plant foliage while treating plants with insecticidal soap and oil sprays will reduce spider mite populations considerably, giving plants time to recover.
So that’s the good news. But here’s the disclaimer: You can rid your plants of spider mites, but it’s not going to be easy. It will often take at least two weeks of concerted effort, followed by careful attention and a routine fertilizer regimen, but if you take note of the four-step process I’ve detailed below, you’ll be well on your way to ridding your plants of spider mites.
Step 1: Determine the Level of Infestation
When people talk about spider mite infestations, they often talk about them in somewhat general terms, like you either have spider mites or you don’t. Unfortunately, this lack of specificity means that the advice is often one-size-fits-all, as in, “If you have spider mites, do X.”
But here’s what I’ve learned after battling spider mite infestations during several different growing seasons: the level of infestation matters.
If you notice a minor localized problem–maybe some stippling on a single plant–the treatment plan you need to adopt might be very different than if you’ve got a heavy infestation across numerous plants, beds, or rows.
This is why, as I’ve noted in articles on understanding spider mites and recognizing the damage they cause to plants, I’ve come to view spider mite infestations in terms of four distinct stages.
Spider mites have the ability to reproduce exponentially if left unchecked, so each stage corresponds to different spider mite population densities and requires different treatment plans to stop the infestation.

Stage 1: In this stage, spider mites have just made their appearance in your garden. There’s likely signs of damage on a single plant and possibly only a single branch or leaf of that plant. What you’ll often see is stippling across some foliage, little white dots where the spider mites have started removing the chlorophyll from parts of your plant. If you notice the infestation at this point, you can act quickly to keep them from spreading to surrounding plants.
Stage 2: During this stage, spider mites are likely still on a single plant, but they’re growing in number. There are now so many stipples that the tiny spots have begun to coalesce into white patches due to the fact that the spider mites have drained the chlorophyll from small sections of the plant’s foliage.
Here’s where things can go wrong quickly. Female spider mites can lay anywhere from 8-20 eggs per day, and newly-emergent spider mite nymphs can fully mature in as little as a week. The difference between a Stage 1 infestation and a Stage 2 infestation could be the difference between 20 spider mites and 200 spider mites. Although the visible damage might still seem minor, the spider mite population is trending toward a tipping point. Given the right environmental conditions, they might have already spread unnoticed to one or two nearby plants.
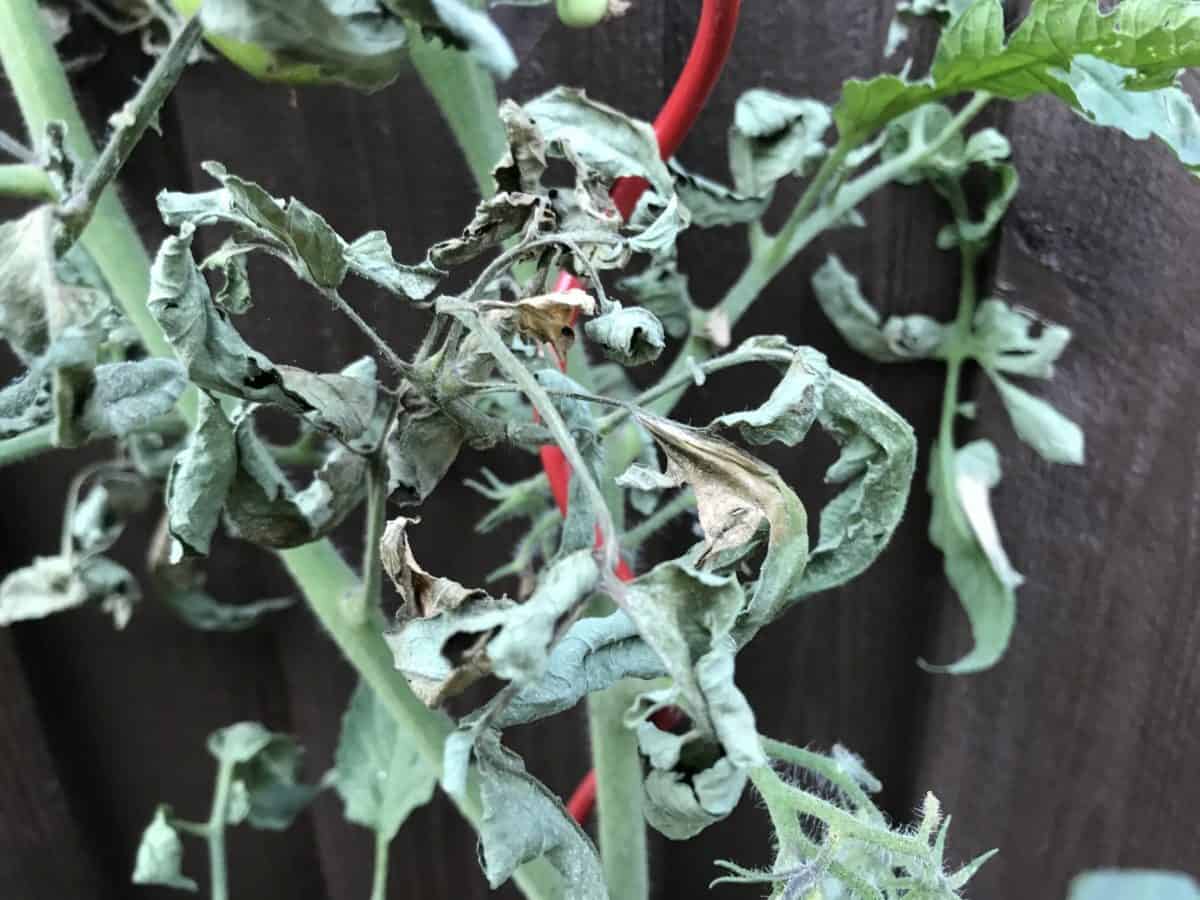
Stage 3: Unlike Stages 1 and 2 infestations, which novice gardeners might overlook, Stage 3 is visible to practically anyone. At this point in time, you’ll notice stippling across most of the plant, with numerous brown, dry patches spread across multiple branches and extensive leaf curl. You’ll also probably notice wispy webs starting to appear, which make it easier for spider mites to hitch a ride to other areas of your garden.
By now, you’ve likely got hundreds of spider mites on a single plant, and if you look closely, you’ll possibly notice Stage 1 or even Stage 2 infestations on nearby plants.
When you get to this point, you can still save the original plant, but you’ll need to act quickly to treat the infestation before it gets worse, and you’ll need to keep up your efforts for at least two weeks. And even then, there’s a chance that the original plant might not make it. Your goal at this stage is not necessarily to save a single plant but to keep the spider mites from spreading further.
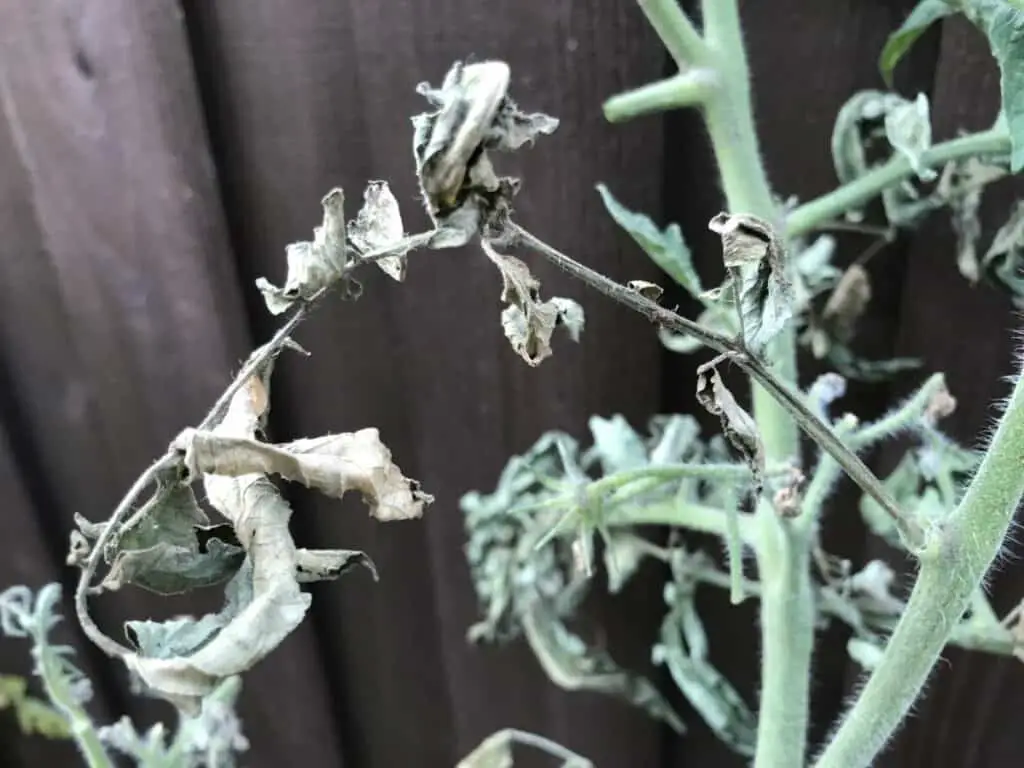
Stage 4: Plants at this stage usually have extensive foliage decay as well as visible webbing on numerous leaves, stems, or branches. Having drained much of the plant’s chlorophyll, the spider mites will look to migrate to other nearby plants. You’ve likely still got life in the plant, but it’s a breeding ground for spider mites.
I don’t think it’s worth your time trying to save a plant in this condition, given the scope of the infestation and the damage done to the plant. It’s best to dispose of it, which at least guarantees that a large number of spider mites are immediately removed from your property.
Step 2: Develop a Treatment Plan
When it comes to treating spider mite infestations, I think the best approach is not a one-size-fits-all method. Instead, I evaluate the infestation, figure out which stage it’s in, and design my treatment plan accordingly.
Over the years, I’ve dealt with all four stages of spider mite infestations, and here’s the approach I’ve adopted for each of them.
Stage 1 Treatment Plan: If you can catch a spider mite infestation at this stage, you’re in luck. I noticed two plants with Stage 1 infestations last season, and here’s what I did: I filled a 1-gallon sprayer with 5 tablespoons of good insecticidal soap. I then sprayed the plant–both the tops and undersides of all foliage–once a day for 4 days.
I then did a close examination of both plants and kept my eye on them over the next week. There were no further signs of spider mites. Problem solved!
Stage 2 Treatment Plan: I get much more aggressive once a plant enters Stage 2 because it’s likely got hundreds of spider mites on it by then. I use the same formula as above–five tablespoons of insecticidal soap in a one-gallon sprayer–but I spray every day for a week. On the fourth day, I substitute a neem oil spray for the insecticidal spray. I mix one tablespoon neem oil with two tablespoons of insecticidal soap in a one-gallon sprayer and spray all of the plant’s foliage thoroughly.
Here’s an overview of my Stage 2 treatment plan:
- Days 1-3: Insecticidal Soap Spray
- Day 4: Neem Oil Spray
- Days 5-7: Insecticidal Soap Spray
At this point, I prefer to use two sprayers so as to make my work more efficient. Whenever I spray my plants, I do so later in the day, usually in the early evenings, to avoid killing active pollinators.
After seven days of spraying, I’m cautiously optimistic that I’ve taken care of the problem. Be careful though. Plants at this stage often have significant leaf curl, and those curls can provide safe havens for the spider mites, allowing them to avoid your insecticidal sprays. You need to make sure that you’ve thoroughly sprayed all of the plant’s foliage and cut off any branches that have extensive leaf curl since it’s too difficult to get your soap into all of the foliage’s folds.
Stage 3 Treatment Plan: Once your plants have reached this stage, you’ve got to do some pruning–possibly even heavy pruning–before you begin other treatment methods. Cut off all dead branches as well as any branches that have extensive leaf curl and either bag the foliage or make sure it goes immediately into the trash can. Just make sure the trash can has a lid. You don’t want any spider mites escaping while you wait for your next trash-day pickup.
After you’ve pruned extensively, follow the Stage 2 directions above but continue your applications for ten days. By the end, you will have sprayed your plant twice with neem oil and eight times with insecticidal soap.
Here’s a breakdown of my Stage 3 treatment plan:
- Days 1-3: Insecticidal Soap Spray
- Day 4: Neem Oil Spray
- Days 5-7: Insecticidal Soap Spray
- Day 8: Neem Oil Spray
- Days 9-10: Insecticidal Soap Spray
This might seem excessive to some people, but I’ve seen what can happen if your treatment plan is a bit too casual. You don’t want an infestation to spiral out of control, so get aggressive for 10 days, then evaluate over the next week to make sure that you’ve taken care of the problem.
Stage 4 Treatment Plan: If I have a plant that’s got a Stage 4 infestation, I’m likely going to pull it out of the ground and trash it. For me, it’s simply not worth the time and effort it would take to remediate the spider mite infestation and help the plant recoup and regrow to its former state (which is often not even possible).
But for those of you who want to tackle a Stage 4 infestation while keeping the plant intact, I recommend removing all infested foliage (which could mean removing most of it) and spraying the plants once every four days with your neem oil spray. On all other days, use the insecticidal soap spray. Continue this treatment plan for 16 days, and don’t miss a single day.
Here’s a breakdown of my Stage 4 treatment plan, which involves the following:
- Days 1-3: Insecticidal Soap Spray
- Day 4: Neem Oil Spray
- Days 5-7: Insecticidal Soap Spray
- Day 8: Neem Oil Spray
- Days 9-11: Insecticidal Soap Spray
- Day 12: Neem Oil Spray
- Days 13-15: Insecticidal Soap Spray
- Day 16: Neem Oil Spray
By the end of this roughly two-and-a-half-week process, you will have sprayed your plant with insecticidal soap 12 times and with neem oil 4 times. You’ll need to pay close attention to your plants, but the likelihood of success is pretty good if you’ve gotten this aggressive for this long.
Step 3: Evaluate the Results
Whatever infestation stage you’re dealing with and whichever treatment plan you’re following, you’ve got to keep your eye on all of your nearby plants. Spider mites can travel from one plant to another, and from one property to the next, with relative ease–something I’ve written about in articles on where spider mites come from and how spider mites spread–so you’ll need to be vigilant when it comes to inspecting the rest of your garden.
If you need a detailed breakdown of what each stage of a spider mite infestation looks like, I’ve written about that as well.
Simply put, if you keep a close eye on the plants you’re treating, as well as any other plants that spider mites like that you’ve got nearby, you’ll notice if the spider mites have spread from their original infestation point to other areas of your garden. And if you can catch them during the very first stage of infestation–especially if you’ve been careful to plant decoy, trap plants and varieties that are resistant to spider mites in the same general area–you can stop their spread before they cause too much additional damage.
If the treatment plans noted above don’t completely eradicate the spider mites, repeat the process until they’re gone, and don’t let up too soon. If you leave any spider mites on your plants, they’ll start reproducing once more and begin the infestation process all over again.
Step 4: Promote Soil and Plant Health
Now that you’ve got your spider mite problem under control, you need to focus your attention on preventative measures.
Spider mites thrive on less-than-healthy plants and do well in dry, dusty conditions. Plants that are lacking in nutrients or stressed by other environmental factors have fewer natural defenses against spider mite attacks. They’re the most susceptible plants in the garden. And sometimes it’s not just a problem with a few plants. Gardens that aren’t properly watered, mulched, and fertilized provide can overall dry conditions that encourage the spread of spider mites.
If you’ve seen spider mites in your garden, you’ll want to give some thought to the following questions:
- Water: When and how often do you water? Do you need to water more? Or water more often? Do you change your watering patterns as the weather changes? Is your soil able to hold moisture well throughout the day, or does it need to be amended?
- Mulch: Do you have some kind of covering over your soil, or is the soil bare around your plants? Have you mulched recently? When did you last do so, and how much mulch did you spread around your plants? How deep is the mulch, and what kind did you use?
- Fertilizer: Do you fertilize your plants, either with compost-rich material that’s added to your garden or with commercial products that provide the nutrients your garden is lacking? If so, when and how often do you fertilize? Have you had your soil tested? Do you keep track of your fertilization treatments? What kinds of products do you use?
When it comes to water, mulch, and fertilizer, every garden’s different, so I’m not going to recommend a one-size-all approach.
But I will say this: The more you care for your soil and ensure healthy growing plants, the less likely your garden is to be attacked by spider mites. If mites arrive, they’ll struggle to gain a foothold, and even if they do, you’ll be well-equipped to recognize an early infestation and treat it quickly.


My very old azaleas are at stage 4 with spider mites. The leaves are gray though the new growth is pea green. Do I prune and treat? Or just trash and start with new plants next spring?
Hi PJ, this is a tough one to answer without seeing the plant in person. Here’s what I’d suggest: Prune off a section of the plant and seal it up in a 1- or 2-gallon plastic bag. Take it to a local garden center (along with some close-up photos of the plant) and see what they recommend. Without seeing your plant, I think you have 2 options. 1) You can prune any dead or dying foliage, then aggressively attack your plant with soapy water spray and occasional neem oil sprays. You’ll then have to wait a few months to see if they recover. 2) If the plants look dead or nearly dead, you might be better off ripping them out and tossing them in the garbage. If it were me, I’d try #1 first to see if it works, then #2 if things don’t look so good when spring arrives. If you join my newsletter or Facebook group, I can take a look at any photos you post. Good luck getting rid of the little menaces!