What Do Spider Mites Look Like on Plants?
If you’ve ever lost a plant to spider mites, you probably know how frustrating it is. I had to rip out two heirloom tomato plants last year because I didn’t know what a spider mite infestation looked like and thus didn’t react soon enough to save my plants.
Thankfully, I was able to mitigate the damage to my surrounding plants. But the experience got me thinking that I might be able to help other gardeners who were struggling with a pretty common question: What do spider mites look like on plants?
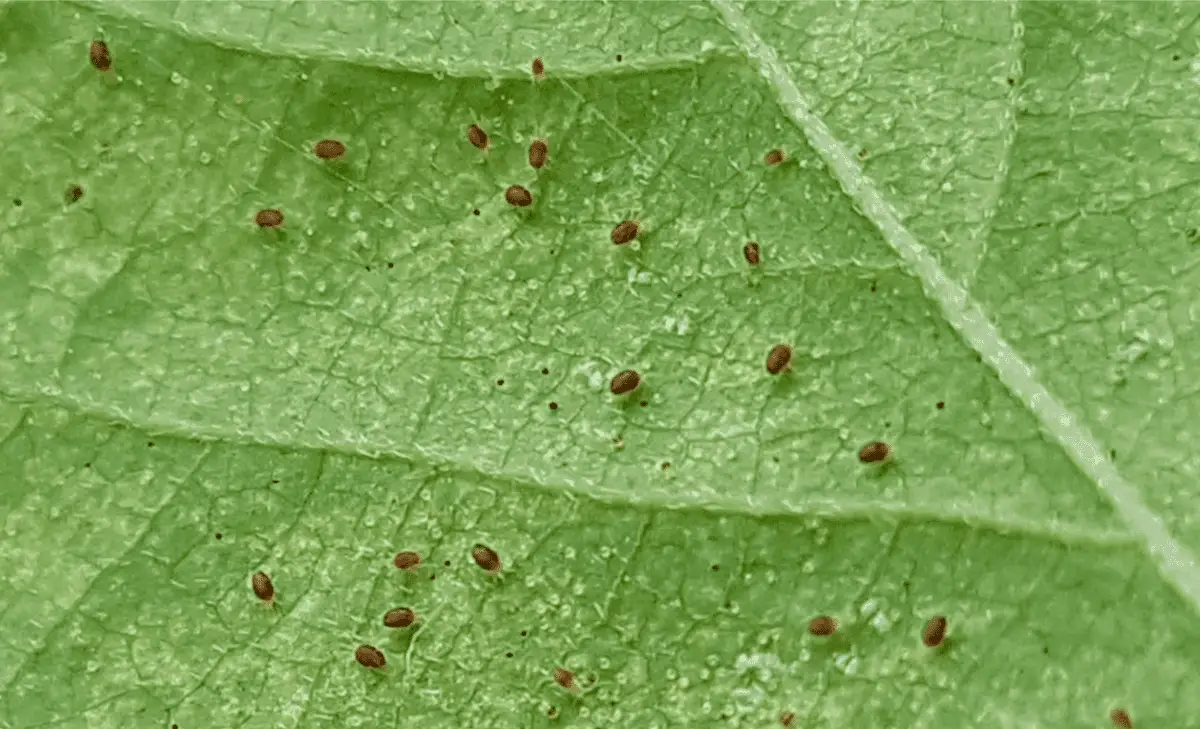
Ranging in size from .1mm to .5mm, spider mites look like red, brown, or black dots on plants and are often found on the undersides of leaves, their preferred place to hide, feed, and reproduce. Spider mites will cause a stippling effect on foliage and spin clusters of thin, wispy webs.
As you’ll see below, this answer is simple and straightforward but recognizing and treating a spider mite infestation requires a keen eye and an understanding of what it looks like and how spider mites spread, which I’ve learned through experience while battling an infestation that nearly took over my garden last year.
Because here’s an unfortunate fact: You aren’t going to notice a spider mite infestation until after the spider mites have arrived on your property. You won’t even know where they came from because they’re usually too small to see with the naked eye unless you’re purposefully looking for them.
With this in mind, it’s crucial to understand what a spider mite infestation looks like and how exactly it progresses so that you can diagnose the problem correctly and determine what steps you need to take to stop these nasty little pests.
Signs of Spider Mite Infestation
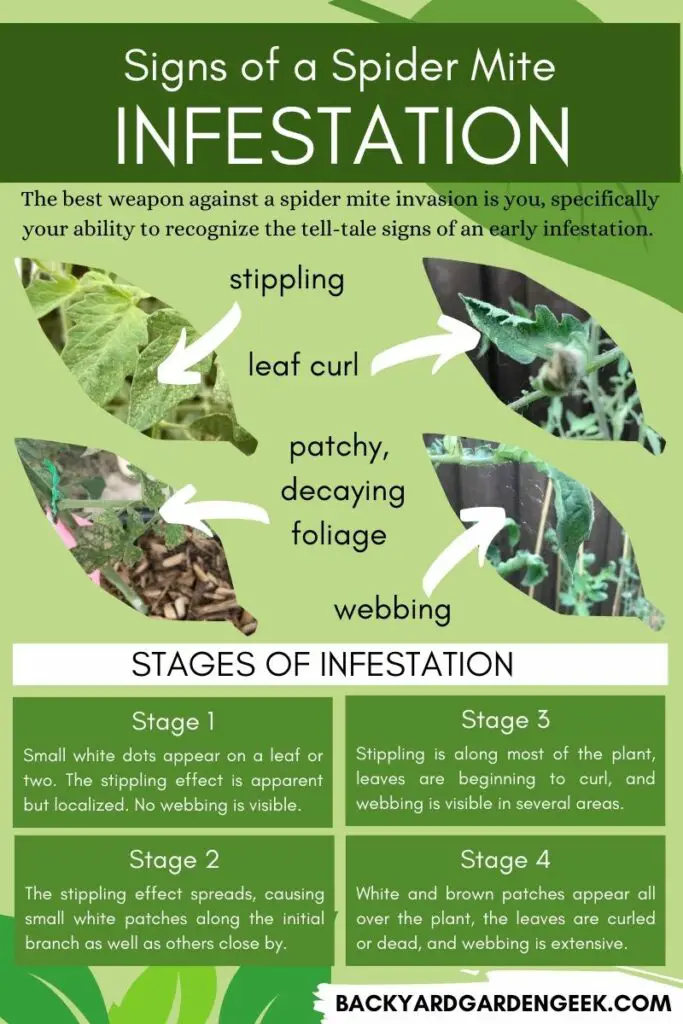
Since you won’t notice when spider mites arrive in your garden or home, the best weapon against a spider mite invasion is you, specifically your ability to recognize the tell-tale signs of an early infestation.
As the infestation spreads, these signs will become more pronounced, so if you see any of these symptoms, be sure to check your plants closely for signs of spider mites.
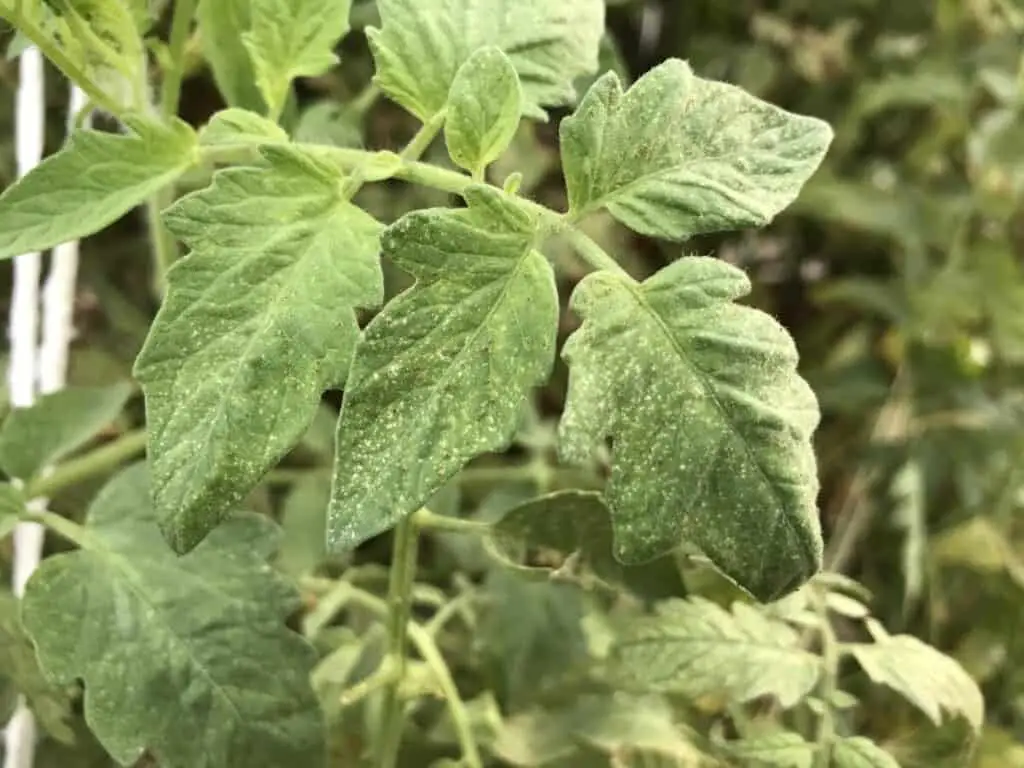
1. Stippling
Spider mites typically make themselves at home on the underside of leaves. Foliage protects them from the elements while also giving them a nice little place to lay their eggs (which they’ll do within just a few days!).
Spider mites don’t bite plants. What they actually do is penetrate the plant’s cellular structure and suck out its juices.
As they do so, you’ll begin to notice sparse patterns of small white dots on the leaves since the spider mites have begun to slowly drain the plant of its chlorophyll.
At first, this will be a localized phenomenon–maybe just a leaf or two on a single branch. But the white spots will soon increase in number and begin appearing on other nearby leaves as the mites spread from leaf to leaf and branch to branch.
If left untreated, those white spots will so thoroughly blend together that you’ll no longer see spots but small blotchy patches of decayed plant material.
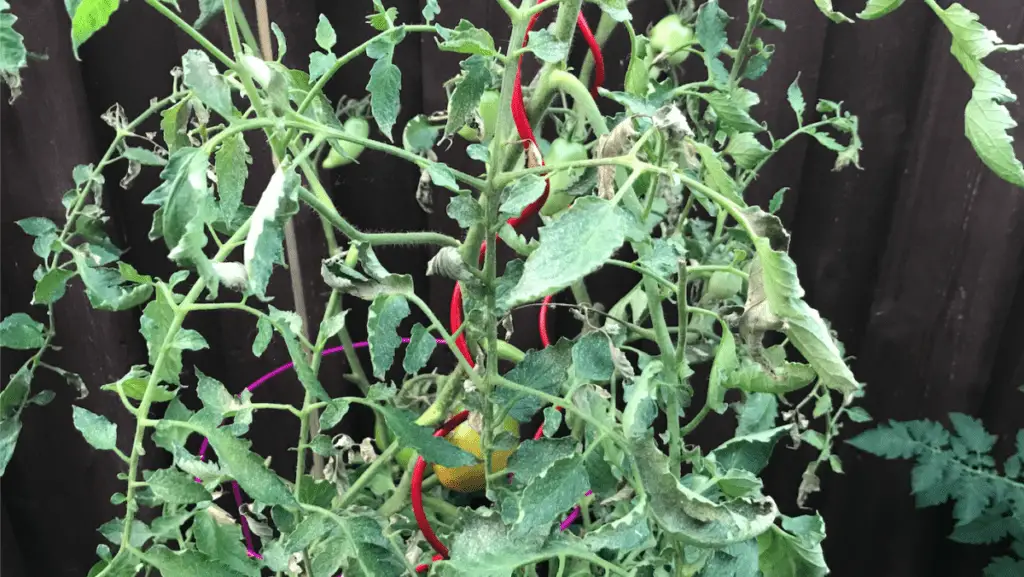
2. Leaf Curl
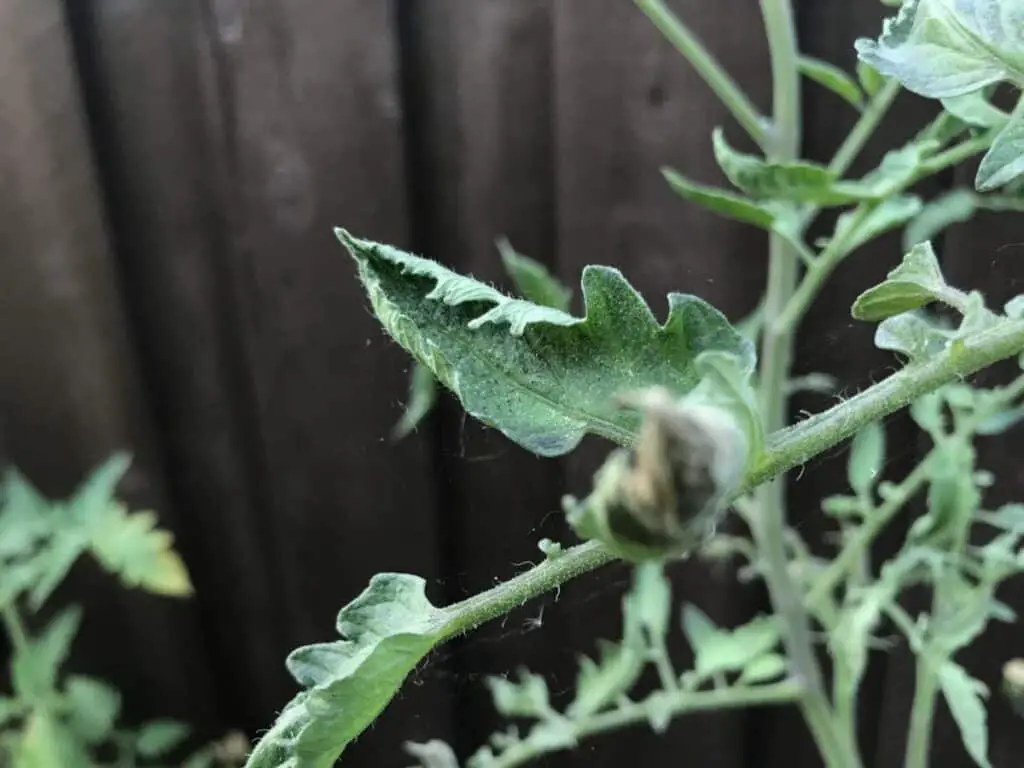
When plants are under stress, their leaves will often curl as the plant attempts to protect itself. There are many reasons for leaf curl–so you’ll need to take a close look to see if there’s any stippling on the plant’s foliage–but when it comes to spider mites, stippling will appear first, followed by leaf curl shortly thereafter.
This is another reason why you’ve got to diagnose and destroy spider mites as soon as possible. As the plant’s leaves curl under stress, they provide an even safer haven for spider mites. In other words, every day that a spider mite infestation is overlooked gives the spider mites an additional advantage.
Here’s why: Spider mites are fragile and die when exposed to blasts of soapy or oily water. This is why they usually hide on the underside of leaves. The leaves provide protection from things that might otherwise kill them.
Gardeners will typically spray plants that are infected with spider mites (more on that below), but unfortunately, curled leaves work to mitigate the effects of those sprays, blocking the spray from reaching hidden spider mites. The more curled leaves your plant has, the more protection the spider mites have.
Given that added protection, they’re able to reproduce in greater numbers, and this furthers the infestation and results in more curled leaves, which means that the cycle not only continues but does so at an exponential rate.
3. Patchy, Decaying Foliage
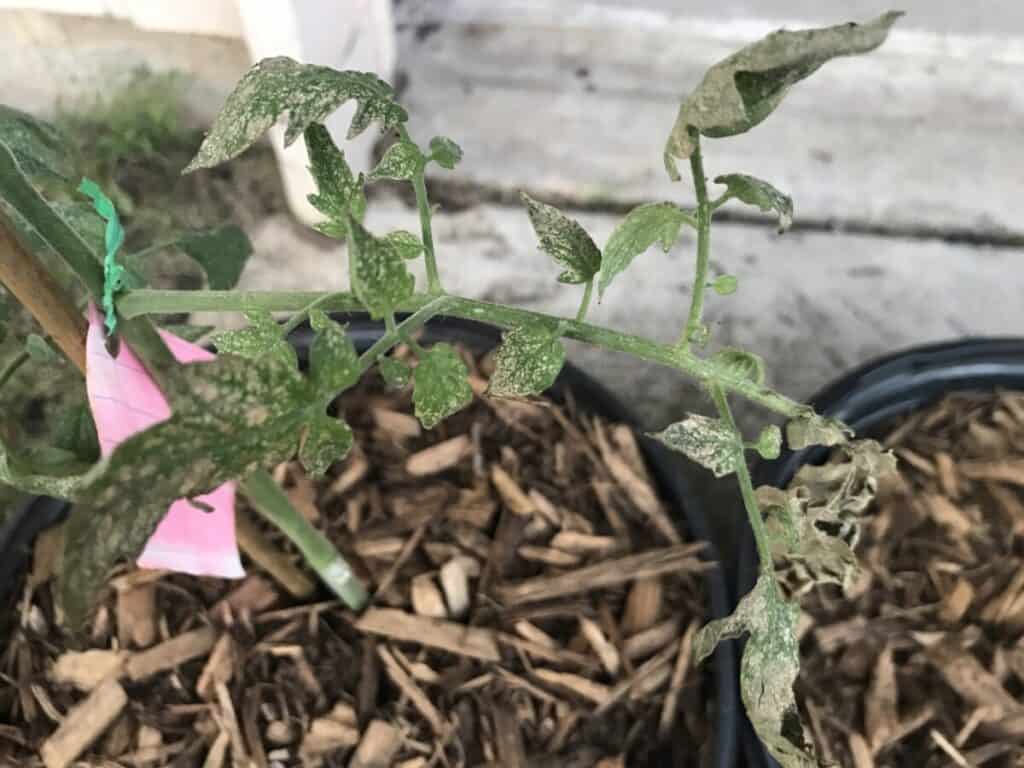
What you’re witnessing when you see white or brown patches on your plant’s foliage is the expansion of the stippling effect to the point where there are no longer stipples but entire sections of the plant that have been drained of chlorophyll.
White patches will quickly turn brown and crusty as the plant’s leafy material dies and decays, so if you notice this patchy appearance anywhere on your plant, you must act quickly.
As leaves decay, you’ll witness a similar albeit exaggerated effect to that which takes place due to leaf curl–decaying and dead foliage will make it even harder for you to kill the spider mites by providing them with additional barriers of protection against your treatments.
Once leaves reach this state of decay, it’s best to prune and trash them. By removing the infested foliage, you’ll not only remove hundreds, if not thousands, of spider mites from your plant.
You’ll also remove a protective barrier that stands between you and the remaining pests.
4. Webbing
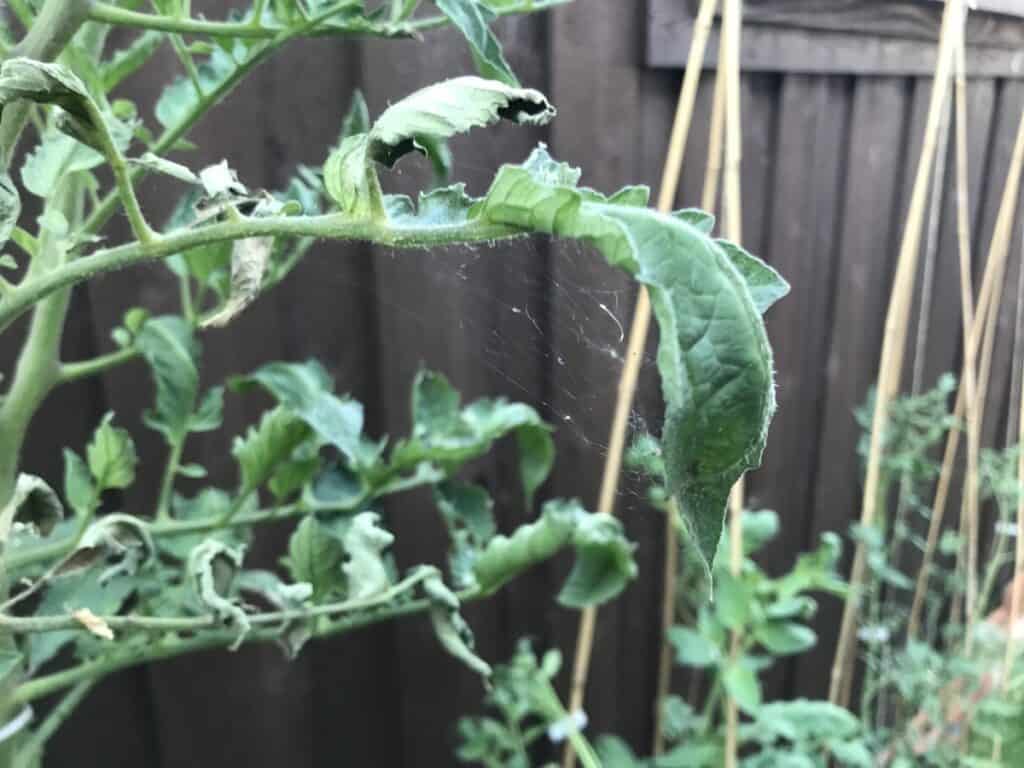
In the early stages of a spider mite infestation, you likely won’t notice much, if any, webbing on your plant. As spider mites proliferate, you’ll begin to see small wispy threads in or around a few leaves and branches.
But spider mites are not spiders, so don’t assume that these are spider webs. Unlike spiders, which produce webs that are designed to catch prey, spider mites leave behind thin silky clusters that are relatively sparse at first but that will grow in size and number as the infestation continues.
These webs serve two primary purposes:
- First, they provide additional protection for the spider mites, which allows them more opportunity to spread to surrounding leaves and branches.
- Second, and perhaps most disastrously, they provide a mechanism for the spider mites to travel from one plant to another and from one garden to the next.
Simply put, in moderate to strong winds, segments of these silky webs can be blown off plants and sent into the air. Given their wisply structure, the webbing can travel from one place to another, carrying spider mite passengers to other corners of your property or to other properties in the nearby vicinity.
From what I can tell, it’s unclear just how far spider mites can travel in this manner. But given the right conditions and the rate at which spider mites reproduce, a localized infestation could quickly spread across your property and onto your neighbors’ plants as well.
If you see webbing, act quickly to avoid both localized and widespread spider mite infestations. Hopefully your neighbor will too!
Stages of Spider Mite Infestation
When people discuss spider mite infestations, they typically refer to the infestation as a singular event, something that’s happening to your plant and that you need to address in a timely manner.
There’s nothing necessarily wrong with this approach, but based on my experiences–and given the results of a study I conducted in my backyard with six tomato plants–I’ve come to think of spider mite infestations in terms of four distinct stages.
1. Stage One: Localized Stippling
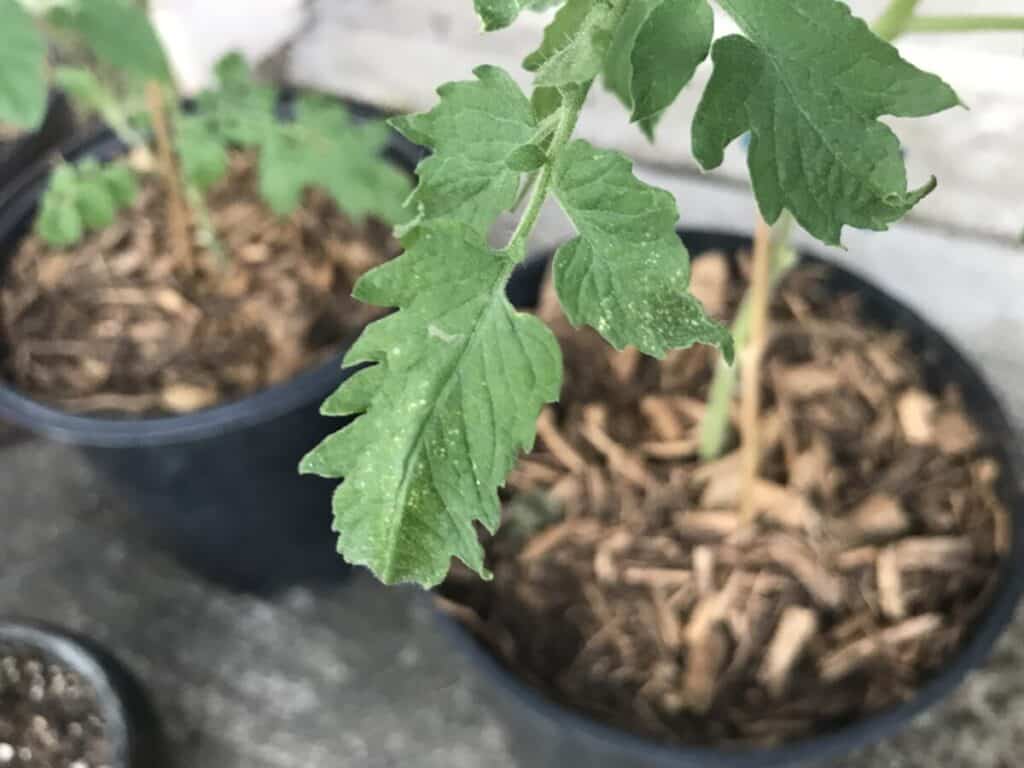
In this stage, you’ve got a very localized spider mite infestation, likely only on one plant or even only on a few leaves of that one plant.
You’ll be able to see a stippling effect, but only if you’re paying close attention to the plant’s leaves. The spider mites are likely hiding under the affected leaves and haven’t yet had time to spin their silky webbing in any noticeable way.
If you’re fortunate enough to catch the infestation during this first stage, you’ll be able to take care of the problem with relative ease and keep the spider mites from spreading. But even experienced gardeners can miss these early warning signs.
2. Stage Two: Extensive Stippling and Leaf Curl
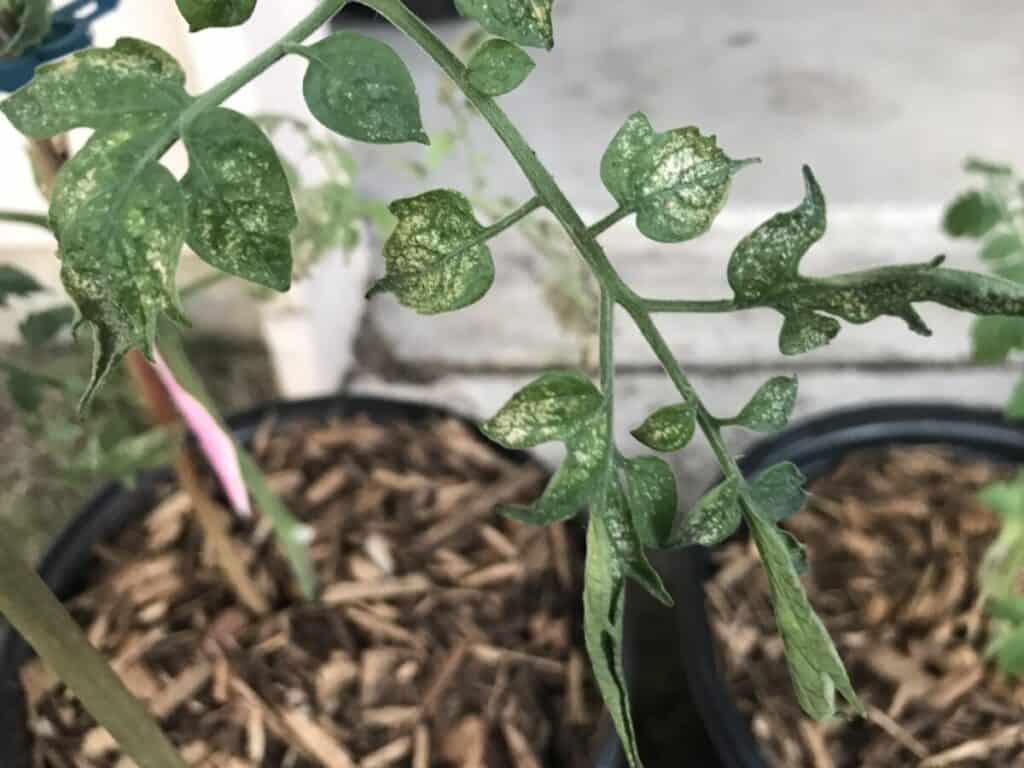
Here’s where beginning gardeners will start to notice that something’s really wrong.
In this stage, the stippling effect has spread to all of the leaves on a branch and possibly to a few leaves on surrounding branches as well. You might notice some slight webbing and leaf curling, but it’ll be easy to overlook.
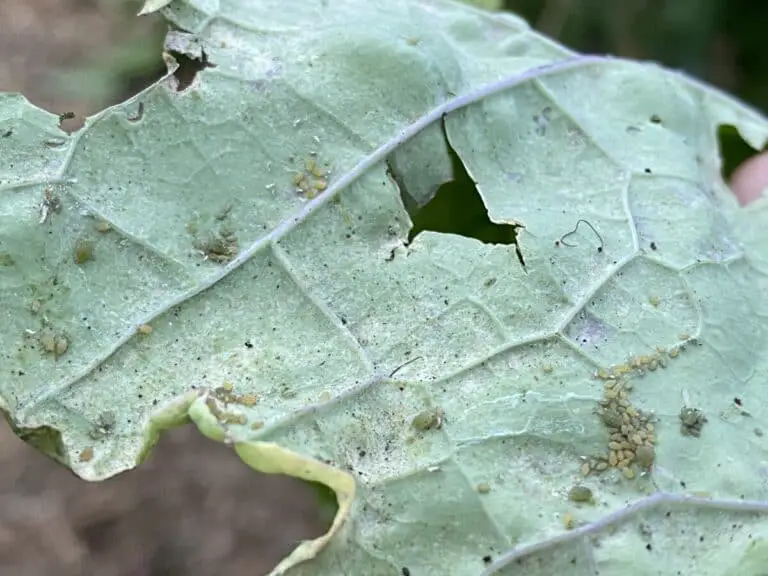
The stipples are growing in number, so much so that small white patches are forming where hundreds of stipples have seemingly merged together. If you flip over a stippled leaf, there’s a good chance you’ll see red, brown, or black specks on the back.
You can even rub your finger on the leaf or shake it over a piece of white paper. If you do, you might see tiny streaks on your fingers or little dots on the paper.
During this stage, most experienced gardeners will notice that they’ve got a problem of some kind and begin remediation efforts, but it’s quite common for inexperienced gardeners to mistake the effects of spider mites for that of other common problems or garden pests.
When I was new to gardening, I remember seeing some very small, wispy webs on several plants one summer and thought that were the handiwork of helpful spiders. Imagine my surprise when my plants started dying a few weeks later!
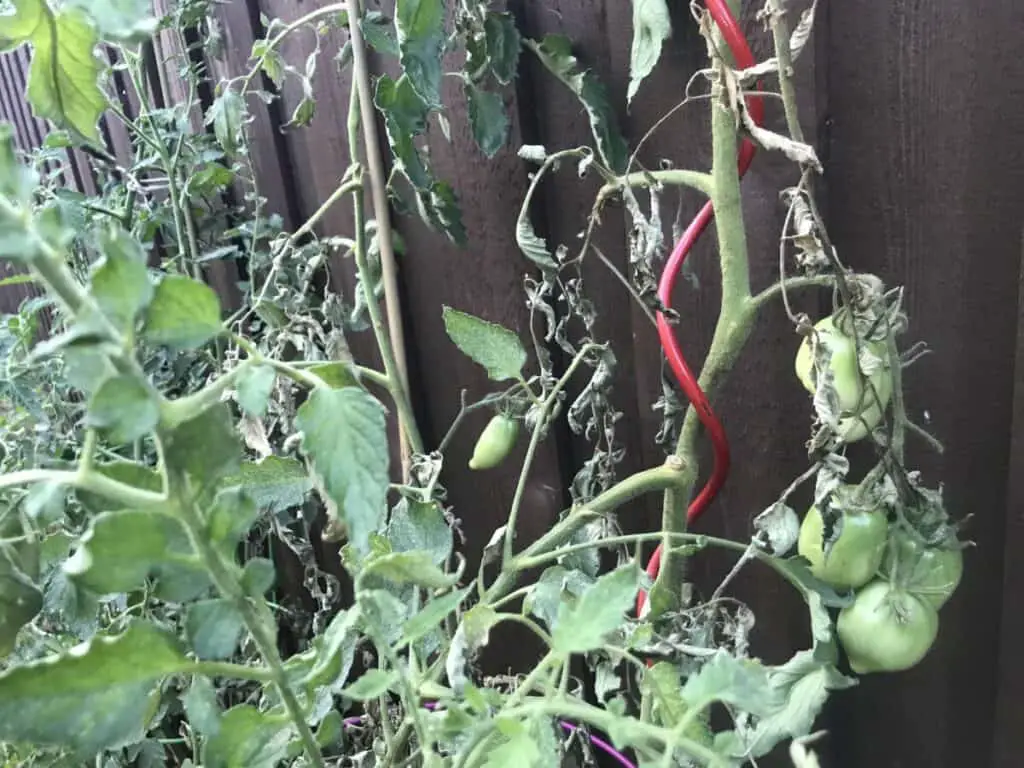
3. Stage Three: Decaying Foliage and Extensive Leaf Curl
At this stage, the stippling effect can be seen across much of the plant, and brown spots are starting to form as the plants’ foliage dries up and dies. Leaf curling will begin to be readily apparent as the infestation stresses the plant.
Experienced gardeners will be fighting day after day to stop the infestation. Inexperienced gardeners will likely be looking online for answers or turning to gardening forums for assistance.
Unfortunately, any delays at this point will likely result in extensive damage as the spider mite population increases exponentially.
As noted above, leaf curl and dead dead foliage will provide additional layers of protection to the spider mites.
At this point, you’ll need to prune the worst-looking parts, and even if you prune heavily and begin a treatment regimen, there’s a decent chance that the plant won’t survive the infestation.
4. Stage Four: Extensive Dead Foliage
During this stage, the patchy spots have given way to widespread plant decay. Leaf curl is visible across the entirety of the plant, white or brown patches have mostly turned into decayed foliage, and webbing is both visible and extensive.
If your plant has reached this stage of infestation, it will likely have thousands, maybe even tens of thousands, of spider mites crawling around on it (pretty disgusting, right?).
Sadly, plants at this stage will not probably survive the infestation, and they’ll also serve as prime sources of spider mite transmission to other parts of your property.
At this point in time, even the most aggressive treatment regimen might not save your plant. I recommend harvesting whatever fruit you can, then getting rid of the plant.
If you’re dealing with an indeterminate tomato plant, you might be able to prune it extensively to get rid of the most infested parts of the plant, then treat what healthy foliage remains using the methods detailed below.
But I’d be careful with this approach since it potentially gives spider mites time to migrate to other nearby plants.
When it comes to disposing of infested plants, do not put an infested plant in your compost bin, and don’t burn it either.
Instead, you should cut the pieces down to an appropriate size, place them in a sealed bag or a trash container with a lid, and put them out with your other trash. You want that kind of infestation off your property as soon as possible.
After handling a heavily infested plant, I recommend that you immediately put on a new pair of clothes, put the dirty clothes in the washing machine, and clean your tools. Spider mites are incredibly adept travelers, and in doing so, you’ll ensure that you don’t inadvertently transfer spider mites to other plants in your home or garden.
Can Spider Mites Travel to Other Plants?
Spider mites can easily travel between plants. They typically do so by crawling across interlinked foliage, hitching a ride on clothing or tools, or flying through the air on a strong gust of wind.
In fact, I’ve even witnessed this process. Last season, I noticed an early spider mite infestation on a Brandywine tomato plant that was planted right next to one of my cherry tomato plants. I bent down to look at two intertwined branches and spent a few minutes carefully examining one of the more stippled leaves.
To my surprise, two of the red dots seemed particularly active, and as I watched, I saw a red dot slowly move across the edge of a leaf that was touching another leaf.
Since it was heading toward the second leaf, I was curious to see what would happen, so I kept watching. It took about 15 minutes, but during that time, it managed to move from its original leaf to the second leaf.
In other words, the branches had formed a bridge from the first plant to the second, and the spider mite had lost no time in making good use of that bridge.
The same kind of thing can happen with clothing or tools. Because of their size, spider mites can be transported unknowingly from one plant to the next as you go about your work in your home or garden.
There’s no way to determine if a spider mite has hitched a ride from one place to another, so your best course of action is to be careful when working around infested plants and to change your clothes and wash your tools if you’ve been in close proximity with a plant that appears to be suffering from a stage three or four infestation.
Can Spider Mites Crawl on Humans?
Clothing is likely one cause of human-borne spider mite transmission, but spider mites can climb onto just about anything, so transmission via skin or hair is also possible.
Last summer, I tested this theory by inspecting an infested Purple Russian tomato plant. I examined several damaged, curled leaves and noticed dozens of spider mites on one of them. I placed my fingernail against the leaf in close proximity to the mites. When I did so, I was able to scoop a few mites onto my finger.
There’s nothing to worry about in terms of your health or safety. Spider mites are fragile and die easily, and there’s no evidence that they can harm humans in any way (unlike their tick cousins). But you’ll need to take care when working around plants that have varying degrees of spider mite infestation.
How Do I Stop Spider Mites from Spreading?
To stop the spread of spider mites, you should first diagnose the stage of infestation, then take one of the following actions:
1. Water
For early stages of infestation, you might be able to stop the spread of spider mites by literally blasting them off your plant with a water hose.
You’ll need to take care not to damage the plant or spray the spider mites onto nearby plants, but spider mites don’t have the strength to withstand a burst of water. Some people prefer this method since it doesn’t involve any chemicals or oils.
I’ve even seen people with house plant infestations take their plants into the shower with them. But personally speaking, I don’t find water to be a particularly effective solution.
2. Soapy Water
To increase the odds of success, you can add soap to your water and spray your plants thoroughly. Spider mites will typically die if sprayed with a soapy water solution.
I recommend mixing five tablespoons of a good insecticidal or castile soap (such as Dr. Bronner’s) in a handheld one-gallon pump sprayer and making sure to get both the tops and bottoms of your leaves.
3. Soapy Water + Neem Oil
For stage two and three infestations, you’ll need to get more aggressive by mixing neem oil into your soapy water solution.
Neem oil will coat spider mites and thus kill them, but you’ll have to be careful to spray your plant thoroughly, or you’ll merely delay the infestation.
Be sure to apply this solution in the early evening. If you apply during the morning or afternoon, you risk burning your plants.
4. Companion Planting
To lessen the impact of spider mites once they arrive in your garden, it’s best to practice a form of companion planting where you situate plants that spider mites like alongside plants that repel and resist spider mites as well as plants that trap them.
This way, you’re creating a natural barrier between plants that are susceptible to spider mites and those that aren’t.
Whatever you decide to do, I’d recommend tracking your treatments using a calendar or calendar app. You’ll need to make sure you’re treating the plant every few days while not over-applying ingredients such as neem oil. Please be sure to follow the instructions on the packaging when it comes to spider mite treatments.
One final note: I personally don’t recommend insecticides or miticides, although I understand why some commercial operations use those methods. I prefer natural, organic sprays because they’re very effective as long as the infestation is caught early on.
Further Information
Want to learn more about spider mites and other nasty garden pests? If so, I recommend reading these related articles:
- 11 Proven Ways to Stop, Kill, and Get Rid of Spider Mites
- Do Marigolds Repel or Stop Spider Mites
- Can Plants Recover from Aphids? Tips to Save Your Plants
- Will Aphids Go Away on Their Own? 9 Things to Know
- Will Aphids Spread to Other Plants?
- Will Rain Wash Away or Get Rid of Aphids? 4 Things to Consider
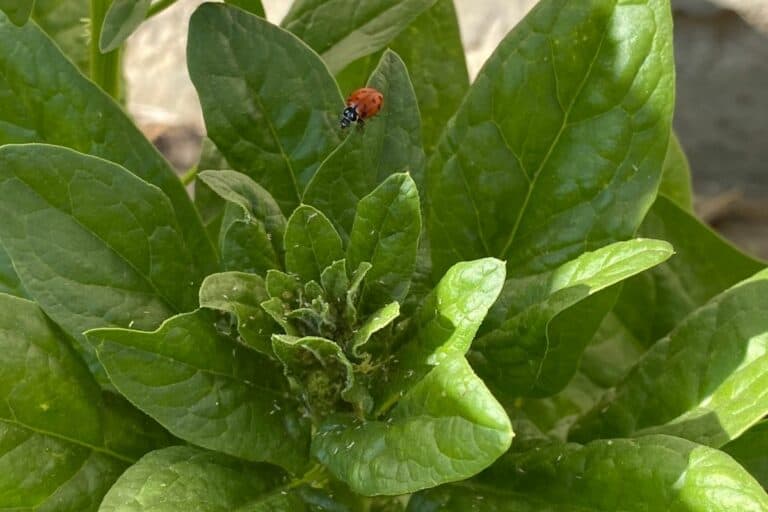
Featured Image: Close-Up of Spider Mites, Wikimedia Commons


Hi. My Husband got spider mites off of a Pine Tree we cut down. I have tried prescription cream, Neem Oil, Rubbing Alcohol, Vicks, Hydrocortisone,Coconut Oil, and nothing seems to help. He’s had these for 6 months. Please help. Thank you
Hi Joanne, I’m very sorry to hear about your husband’s ailment. Spider mites can only live and feed on plant tissue (since they’ll die quickly anywhere else), so I’m guessing your husband is dealing with some other kind of problem. Please contact a medical professional since this goes beyond my area of expertise. Wishing you both my best as you figure out what’s going on!