Are Spider Mites Spiders? How to Identify These Garden Pests
I’ve been gardening for years, and of all the pests I’ve ever dealt with, spider mites have caused some of my biggest headaches and frustrations. As a novice gardener, I had never heard of spider mites, so when I saw webbing around several leaves of a tomato plant, I assumed that that was a sign of spiders (whoops!).
Unfortunately for me, that wasn’t the case, and a month or so later, as I was ripping out several tomato plants that had been destroyed by spider mites, I realized what can happen if you can’t quickly identify a growing spider mite infestation.
It was a tough lesson to learn, especially for a new gardener, since I had grown all my plants from seed for the first time that year and felt terrible when I had to rip them out of the ground during the prime summer months.
After that experience, I decided to learn everything I could to avoid future spider mite infestations. I thought back to the first mistake I made and realized that I couldn’t answer a seemingly simple question: Are spider mites spiders?
To keep your plants safe from spider mites, you’ve got to be able to correctly identify them so that you’ll know what they look like and how they spread. Hopefully the information below will help you avoid my early mistakes so that you don’t have to rip up your plants like I did.
Are Spider Mites Spiders?
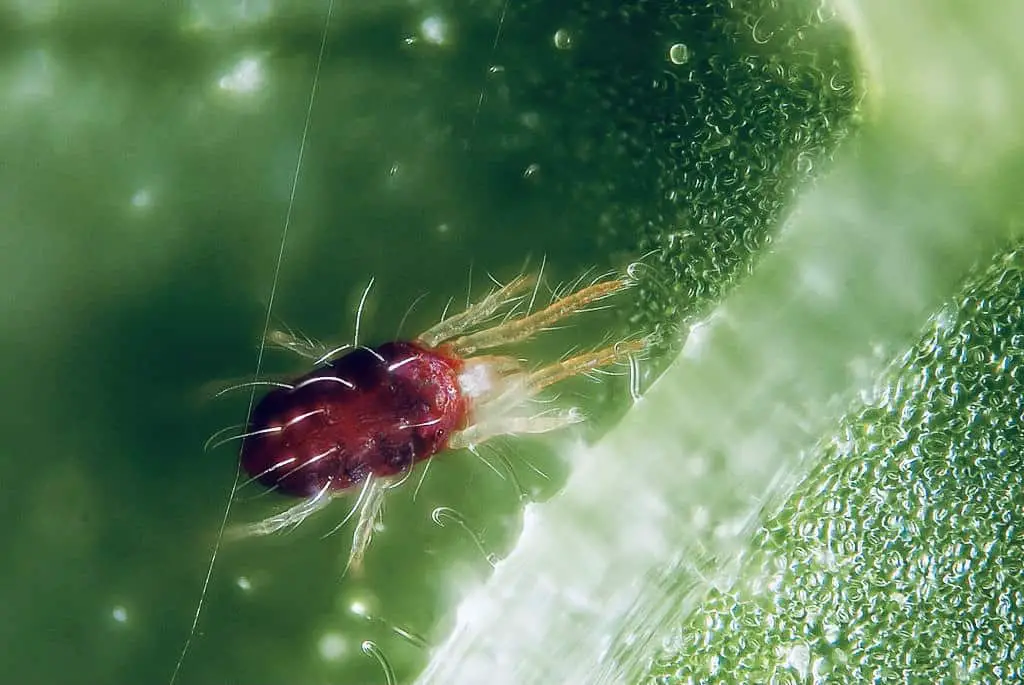
Although spiders and spider mites are both arachnids (from the phylum Arthropoda, class Arachnida), spider mites are not spiders. Spider mites have eight legs, but they are more closely related to ticks than spiders and primarily feed on the chlorophyll of plants.
Spider mites are very small. Averaging anywhere from 1/150 to 1/50 of an inch (.1mm to .5mm), they can be seen by the naked eye but just barely. They’ll typically appear as tiny brown, black, or red dots on the underside of leaves.
In fact, when I first started looking out for them, I borrowed my son’s toy magnifying glass since I was having trouble verifying if they were on my plants or not.
If you’re able to view them under a microscope, prepare to be surprised and possibly a bit grossed out as well (unless you’re an entomologist). Spider mites have bulbous round bodies, two spots on their abdomens (if they’re the common Tetranychus urticae), and microscopic hairs all over.
Female spider mites can lay 10-20 eggs within a very short span of time, and the female larvae that hatch from those eggs are already nearly ready to produce the next generation of spider mites. Some researchers have even suggested that, given the right environmental conditions, spider mites can go through 50 generations in a single year.
If you’re an entomologist, that’s a pretty amazing statistic. But if you’re a gardener like me, that’s downright terrifying.
Where Do Spider Mites Come From?
In order to identify the early appearance of spider mites, it helps to know something about where they come from.
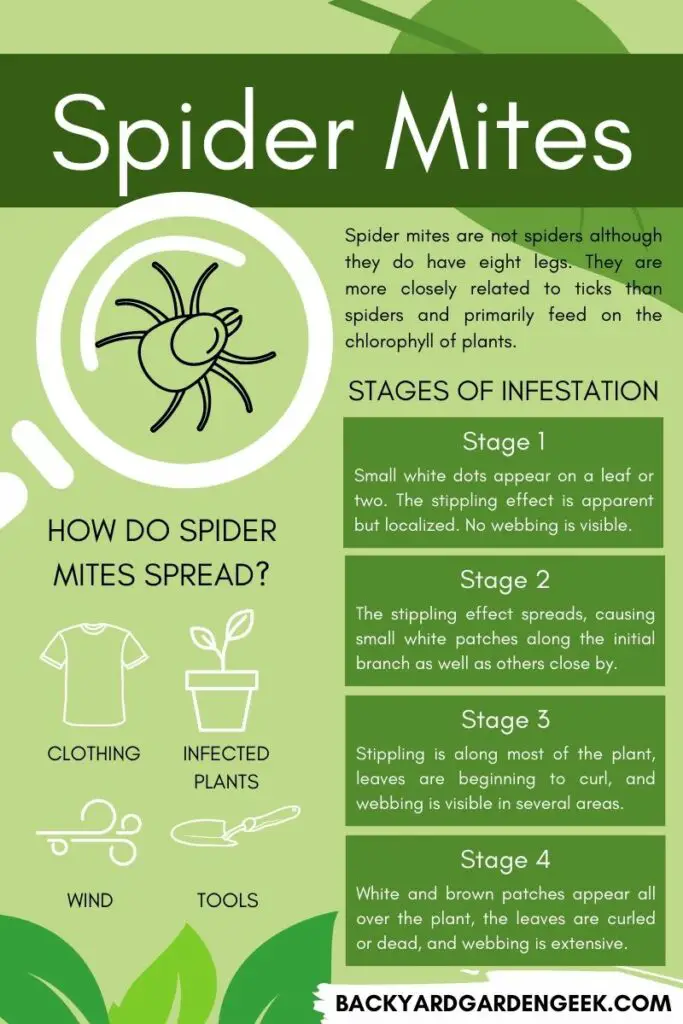
Infected plants and windy conditions are by far the most common sources of spider mite infestation, but spider mites can even travel on clothes or garden tools, which makes tracing the source of transmission practically impossible.
- Infected Plants: When infested plants are purchased at nurseries and other retailers, those plants provide a bridge from the original site of spider mite infestation to your garden or home. Even minor infestations can quickly spread from the original plant to new plants.
- Wind: Because these microscopic pests create small weblike structures, and given their ability to reproduce rapidly, they can often sail in the wind from plant to plant and garden to garden. Unfortunately, this is both unavoidable and undetectable, and as anyone with a greenhouse knows, those structures do not prevent spider mite infestations. In fact, they can often serve to exaggerate them.
- Clothing: Given their ability to adhere to all kinds of surfaces, spider mites are able to travel undetected on clothing from one place to the next. And because of their small size, this form of transmission cannot be detected until the new plants show signs of infestation.
- Tools: Unfortunately for gardeners, spider mites can even travel on garden tools. This appears to be a rarer form of transmission than those noted above, but it’s certainly possible to transport spider mites from one plant to the next on spades, shovels, shears, and other such tools.
But before you throw up your hands in despair, just be aware that you can play a large role in keeping your garden free of spider mites.
Plants that are healthy–planted in nutrient-rich soil and watered and fertilized regularly–are much less prone to spider mite infestation than plants that are under stress due to poor soil conditions or erratic watering. Understanding why spider mites appear, what they feed on, and in what conditions they thrive will go a long way toward helping you avoid a spider mite infestation.
What Do Spider Mites Eat?
Spider mites can feed on all areas of a plant–particularly leaves and branches–but their primary food source is chlorophyll, which they get by puncturing a plant’s cells and sucking up its cytoplasmic fluids.
Unfortunately, spider mites are a global pest that feed on 200+ different species, including vegetables, berries, herbs, shrubs, flowers, houseplants, and trees. The good news is that there are many plants that spider mites hate.
A single spider mite can’t do much damage to a plant, but spider mites reproduce at an alarming rate. If you don’t stop them quickly, you might find that your plants have hundreds, if not thousands, of spider mites that are literally sucking the chlorophyll out of them. Like an army of microscopic herbivorous vampires, spider mites will put plants under immense stress and thus encourage further infestation and destruction.
What Do Spider Mites Look Like on Plants?
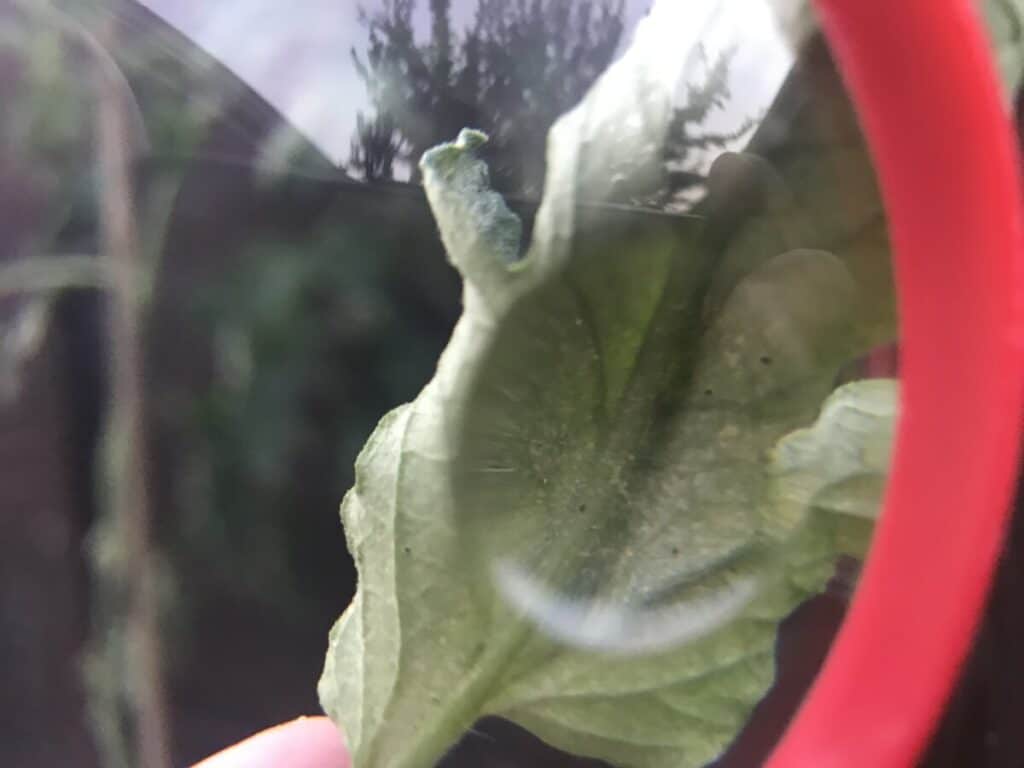
One of the biggest mistakes I made as a novice gardener was my failure to recognize the early signs of spider mites. As I was tending my plants, I noticed a few weblike structures, and in my ignorance, I assumed those were beneficial spiders that were helping to keep my garden free of pests. Boy, was I wrong!
As I noted above, you won’t be able to simply look at a leaf and see a few spider mites–unless you’re looking very closely and know exactly what to look for–so you need to be aware of other telltale signs that you have a problem in your garden.

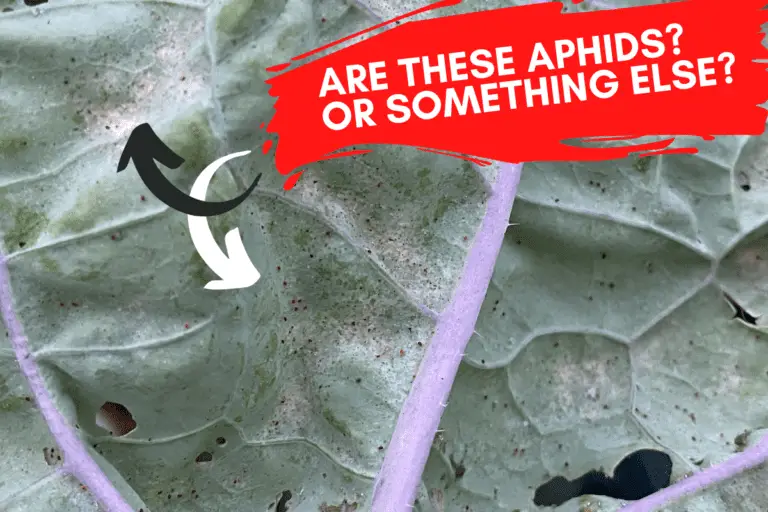
The most visibly apparent sign of a spider mite infestation is discoloration, specifically a stippling effect that appears on infected leaves. These tiny whitish dots will likely be difficult to see at first, but if you’ve got spider mites, you’ll soon notice dozens, or even hundreds, of dots on several of your plant’s leaves within a day or two.
There are typically four stages of infestation, which correlate to various levels of plant discoloration and decay. These are especially visible in garden plants (tomatoes, cucumbers, etc.) whose leaves are thinner and more fragile than some hardy indoor houseplants:
- Stage One: Small white dots appear on a leaf or two. The stippling effect is apparent but localized. No webbing is visible.
- Stage Two: Stippling has expanded to all of the leaves on the initial branch as well as to one or two other branches on the plant. Small white patches are visible due to the exponential spread of the stippling effect. Webbing is often still invisible or easily overlooked.
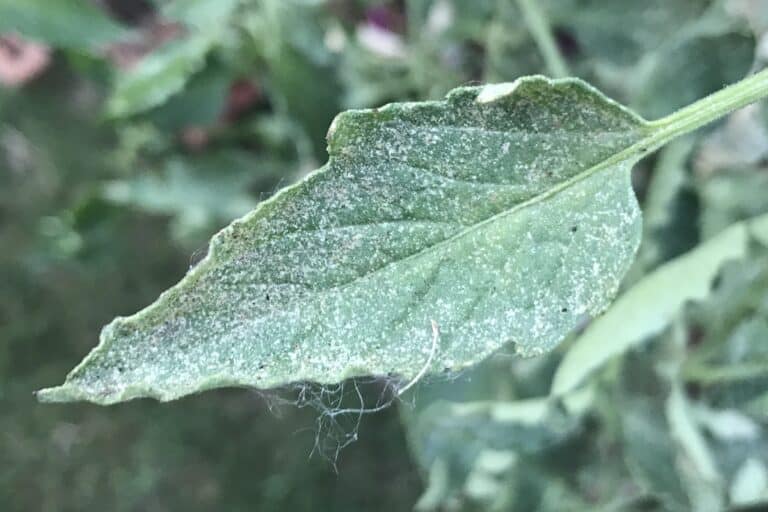
- Stage Three: The stippling effect is visible across much of the plant. The plant’s leaves are beginning to dry up and curl. Webbing is now visible on several areas of the plant, often surrounding entire leaves or even small sections of branches or stems.
- Stage Four: The stippling effect has largely disappeared because much of the chlorophyll has been drained from the plant’s branches and leaves, leaving white and dried brown patches all over. If not already dead, leaves are curled and various shades of brown. Webbing is extensive and easily visible.
In the first stage, the plant shows initial signs of stippling, typically on a few leaves located on a single branch, and there is no webbing visible. If you’re able to recognize the stippling effect early on and act quickly, you can often neutralize your spider mite infestation within a couple weeks.
In the second stage, the stipping effect has spread and now covers multiple branches. You’ll be able to notice signs of stress, such as leaf curling, and the stippling effect will appear on multiple branches and cover most of the leafy material on those branches. As the infestation grows, the stipples will appear to join together into small whitish patches as the leafy material dries out.
At this point, your infestation is about to reach a tipping point. You’ve got to act quickly and purposefully over the course of the next month to keep the mites from overrunning your plant and possibly those in its vicinity as well. One of the primary reasons for acting quickly is that as the leaves curl and dry up, they’ll provide extensive protection from foliar sprays, keeping spider mites free from contact so that they can live on and continue reproducing.
In the third stage, the stippling effect is visible across numerous branches, if not much of the plant. Many of the plant’s leaves are curling and drying up–providing convenient havens for spider mites and their eggs–and some of the earliest infected leaves and branches have turned brown or yellow and shrivelled. The spider mite infestation has likely spread too far, and you are probably better off pulling up and disposing of the plant before spider mites spread to nearby plants.
If you’ve reached the third stage of infestation, be sure to check your surrounding plants for initial signs of spider mite infestation. Given the number of spider mites on your property at this point, there’s a good chance that surrounding plants are going to show stage one or stage two levels of infestation.
By the time your plant reaches stage four, it’s all but dead, and it’s highly likely that the spider mites have been transported to numerous surrounding plants. Plants in this stage of decay must be disposed of immediately. Don’t put them in the compost since certain species of spider mite can overwinter in decaying materials. Don’t burn them either because burning the plant could unintentionally spread spider mites if conditions on your property are windy. In this situation, the best course of action is to remove the plant, bag it tightly to prevent further spread, and dispose of it with other trash.
Can Plants Recover from Spider Mites?
If a spider mite infestation is addressed in its early stages–preferably with a powerful organic insecticidal spray–plants will easily recover and continue to thrive. For those with more moderate spider mite damage, be sure to remove damaged plant material and pay close attention to the plants over the next five to seven days to make sure that there are no signs of continued infestation.
Plants with severe or extensive spider mite damage should be quarantined at the very least (if still in containers) to ensure that the infestation has been stopped. But unless you’ve got plants that resist or repel spider mites–or you’ve been very purposeful about companion planting–you are likely exposing nearby plants to some degree of risk given the ability of spider mites to hide behind curled leaves, then reproduce and move on to other nearby plants. I’d recommend disposing of the plant immediately to avoid the chance of further spread.
Additional Information
If you’d like to learn more about spider mites and other common garden pests, I recommend these articles:
- 11 Proven Ways to Stop, Kill, and Get Rid of Spider Mites
- Do Marigolds Repel or Stop Spider Mites
- 11 Destructive Ways That Aphids Harm Plants
- 12 Reasons Why Aphids Keep Coming Back + 3 Simple Fixes
- 21 Plants That Aphids Love to Attack + How to Stop Them
- Where Do Aphids Come From? Things to Consider
- Why Do Ants Protect Aphids? 7 Things You Should Know
Featured image by Gilles San Martin.