Using Neem Oil on Tomato Plants: An Easy, Step-by-Step Plan
I love growing tomato plants and harvesting all kinds of tomatoes. But over the years, a wide variety of destructive pests–from aphids and leaf-footed bugs to hornworms and spider mites–have done their best to undo all of my hard work.
I’m averse to chemical insecticides, so I’ve recently turned to neem oil–which contains the naturally occurring chemical azadirachtin—as a solution to my tomato pests problems.
Neem oil can be used on tomato plants throughout the growing season, both as a foliar spray and a soil drench. It’s most effective when used against soft-bodied insects (such as aphids, leaf-footed nymphs, and spider mites), but it’ll kill or repel all kinds of unwanted garden pests.
Azadirachtin will kill off or repel over 200 different kinds of garden pests. It causes all kinds of problems for garden pests, from altering the taste of plants to wreaking havoc on bugs’ ability to grow, molt, feed, and reproduce. Although it takes several days to kill off most bugs–and while it decays relatively quickly once it’s diluted and applied to plants–neem oil is my go-to insecticide for getting rid of unwanted bugs in my garden.
It’s much safer than chemical insecticides for humans and their furry friends, and generally speaking, it won’t harm beneficial pollinators and other helpful bugs.
What I aim to do in this article is to provide step-by-step instructions for using neem oil on your tomato plants. This will ensure that your neem oil sprays work as effectively as possible.
Since I began using neem oil 3 years ago, I’ve learned what to do and what not to do, and I’m hoping to share all I can so that you can keep your tomato plants free of destructive bugs this season.
In my article on 10 reasons why you should use neem oil on tomato plants, I explained the rationale behind why I prefer neem to other treatment methods. In this article, I want to provide a step-by-step tutorial so that, after spending 5 or so minutes reading, you’ll know all you need to know to start using neem oil in your garden.
Whether you’re new to gardening or you’ve been working with plants for years, you’ll find everything you need to know below.
Step 1: Purchase a Cold-Pressed Neem Oil Concentrate
You can buy pre-made neem oil sprays, but as I’ve noted in articles on making neem oil more effective and using it to stop spider mites, you’ll save a significant amount of money if you’re willing to spend a few minutes mixing your own spray.
What you’ll need to do first is to purchase a quality, cold-pressed neem oil concentrate, which you’ll dilute with water and a little liquid soap to make a nice, effective neem oil spray.
Here are the two products I use in my garden. Both are great, and they’re both priced very reasonably:
- Bliss Neem Oil
- Verdana Neem Oil
Step 2: Purchase an Organic Liquid Soap
Oil and water obviously don’t mix, so the soap is needed to help them do so. Otherwise, you’ll be left with a relatively ineffective spray.
You can use Dawn as your emulsifier, but I prefer soaps with fewer chemicals. I also love soaps that have peppermint oil in them since essential oils can help with spider mites and other pests.
I’ve tried 3 different soapy emulsifiers with my neem oil spray, and all 3 have worked just fine:
- Dr. Bronner’s Peppermint Castile Soap
- Mrs. Meyer’s Liquid Hand Soap
- Safer Brand Insecticidal Soap
Step 3: Purchase a Handheld Garden Sprayer
You’re going to need a decent garden sprayer if you plant to apply neem oil to your tomato plants. I own 3 sizes: ½ gallon, 1 gallon, and 2 gallon sprayers.
Neem oil won’t last long after it’s been diluted–you’ll want to apply it within 1 hour of mixing, if at all possible–so you don’t want to make more than you need.
If you fill a 2 gallon sprayer with water and neem oil concentrate, you’re going to have a lot of neem oil spray on your hands unless you’ve got a rather large garden.
For most backyard gardens, a ½ or 1 gallon sprayer will work just fine. These are the sprayers that I’m using in my garden right now:
- Flo-Master ½ Gallon Sprayer
- Chapin 1 Gallon Sprayer
- Chapin 2 Gallon Sprayer
Whether it’s neem oil concentrate, liquid soap, or a good garden sprayer, these products should be purchased in advance so that you’ll have them on hand once you need them.
As soon as you notice the early signs of an infestation, you don’t want to waste time waiting for products to arrive. You should figure out what’s attacking your veggies, and if it’s one of many insects that’s susceptible to neem oil, you should immediately make a neem oil spray and spray your plants thoroughly.
Step 4: Identify the Garden Pests
As your plants are developing, keep a close eye on them. The moment you see a problem, do your very best to figure out what kind of pest you’re dealing with.
I recommend joining a few bug-related Facebook groups. That way, if you see any insects in your garden, you can snap a photo, post it to the group, and get expert answers within a few hours.
There are apps you can use–such as iNaturalist or Bug Identifier–but they often require a subscription, and they’re not always 100% accurate. I trust entomologists in local Facebook groups more than I do these apps.
The reason you need to identify invasive pests early is that early identification leads to early remediation, and the earlier you begin attacking your pests with neem oil, the better off your plants will be in the long run.
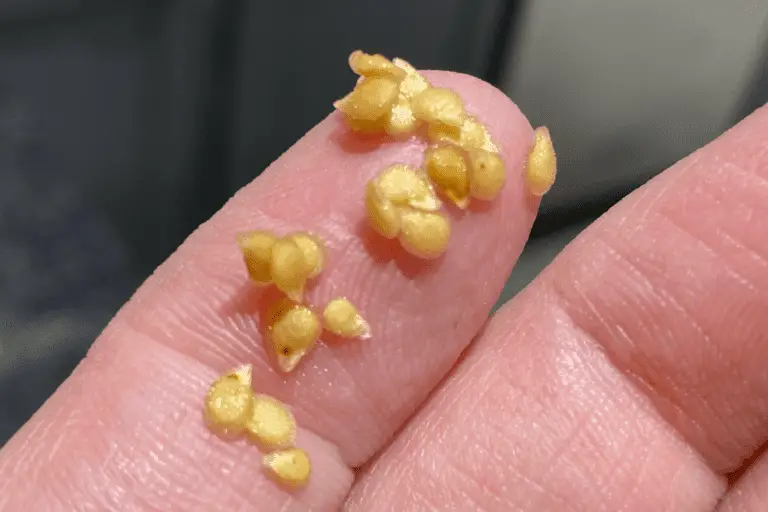
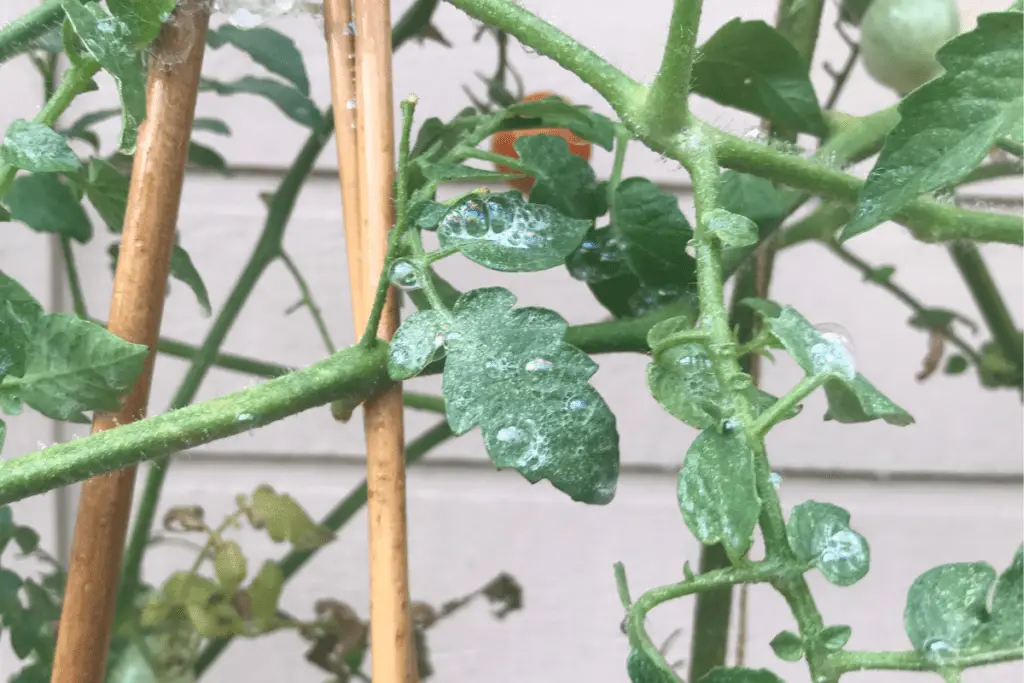
Here’s a good example: Take a look at this photo. What do you see?
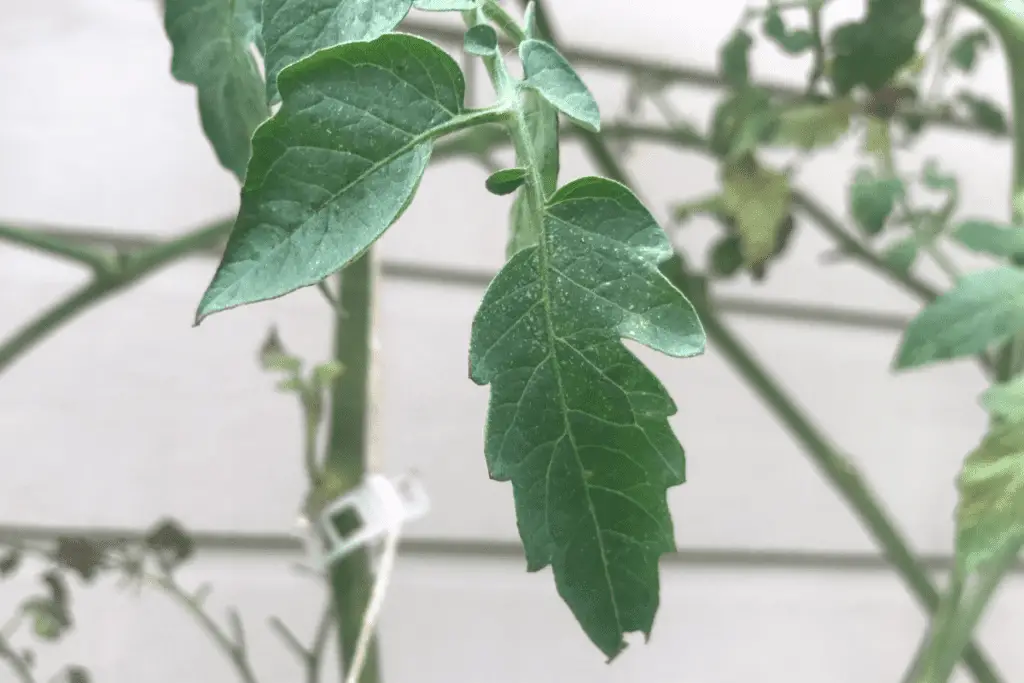
Notice those tiny stipples on the leaves? It’s easy for inexperienced gardeners to overlook such things, but if you’ve learned how to identify the bugs that make that stippled pattern, you’ll do what I did and reach for the neem oil spray immediately since that stippling is evidence of a new spider mite infestation.
If you catch it early, it’s pretty easy to stop. But if you overlook such things and give those spider mites an extra few weeks to reproduce, you could be looking at a major infestation within 1-2 months.
If you’d like to see more photos like these and learn how spider mites nearly destroyed all my tomato plants–and how I fought them off successfully with neem oil–check out these articles:
- Where Do Spider Mites Come From? What Science Has to Say
- What Do Spider Mites Look Like on Plants? (Photos + Video)
- Will Spider Mites Spread to Other Plants?
- Can Plants Recover from Spider Mites? What You Need to Know
Step 5: Remove Dead or Decaying Foliage
When tomatoes are under attack, especially when there’s a more advanced infestation, their leaves will start to curl and dry up. Unfortunately, this provides the perfect shelter for bugs, especially aphids and spider mites, to evade your game oil sprays.
Before you spray your plants with neem oil, you’ll need to cut off any dead or dying foliage. Tomato plants are remarkably resilient, and assuming there’s plenty of time left in the growing season, you can cut off quite a few branches without hurting the plant.
If you don’t cut off these dead leaves and branches, you’ll not only hinder plant growth–since the plant will continue sending nutrients toward decaying foliage–but you’ll also decrease the efficacy of your neem oil spray since the dead foliage will block it from reaching all areas of the plant.
One word of advice when it comes to pruning your tomato plants: Be careful not to accidentally cut the main stem. If you do that, your tomato plant won’t grow any taller. However, it’ll continue producing suckers, so you shouldn’t worry too much if an accident happens since these suckers will produce plenty of fruit whether there’s a main stem or not.
Step 6: Determine How Much Spray You Need
But before you begin spraying, you need to figure out how much neem oil you need. As a general rule of thumb, here’s how I determine whether to use a ½ gallon, 1 gallon, or 2 gallon sprayer.
| Number of Plants | Sprayer Capacity |
|---|---|
| 1-4 Plants | 1/2 Gallon |
| 5-9 | 1 Gallon |
| 10+ | 2 Gallons |
It’s okay if you accidentally make too much or you unintentionally apply too much neem oil to your tomato plants. There’s no need to rinse off the neem oil. Simply let things dry on their own, which it’ll do within a couple hours.
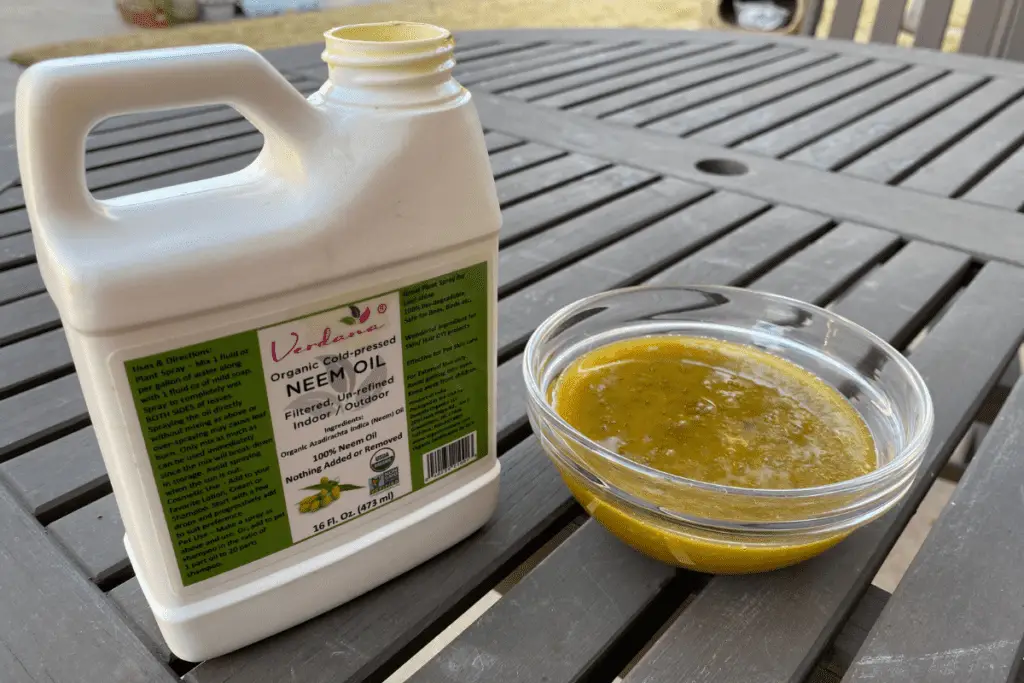
Step 7: Mix Your Ingredients
Mix your neem oil concentrate, liquid soap, and water in a garden sprayer. If you plan on spraying a ton of plants, use a 1- or 2-gallon sprayer, but most of the time, a smaller sprayer works best because you can’t store neem oil after it’s been mixed.
Here’s my easy recipe for making an effective neem oil spray:
| Water | Neem Oil | Liquid Soap |
|---|---|---|
| 1/2 Gallon | 1 Tablespoon | 2 Teaspoons |
| 1 Gallon | 2 Tablespoons | 1 Tablespoon |
| 2 Gallons | 4 Tablespoons | 2 Tablespoons |
You’ll most likely need to spray your tomato plants more than once with neem oil spray, so keep track of when you last sprayed and reapply neem oil 4 to 7 days later, depending on the severity of the infestation.
If the infestation is particularly acute, you might have to reapply neem oil every 4 to 7 days for up to 3 to 4 weeks.
Step 8: Use the Spray Within 1 Hour of Dilution
I recommend spraying your tomato plants with neem oil as soon as you’ve mixed your ingredients in the garden sprayer.
The chemical compounds in neem oil begin breaking down quickly after they’ve been mixed with water and soap, but if you apply the neem oil within one hour of mixing it, it’ll work just fine.
If your name oil has been sitting around for more than 12 hours, I wouldn’t spray your plants with it. I would simply use it as a soil drench.
Even if the name oil has been rendered mostly ineffective, the plants will still benefit from the drench.
This is why I recommend only using organic liquid soap as your emulsifying agent. If I’m going to pour the neem oil spray at the base of my tomato plants, I want to make sure that it’s an organic product.
Step 9: Spray in the Late Afternoon or Early Evening
I’ve seen some bloggers suggest that you can spray neem oil on your plants in the morning, but this is bad advice, which I know from experience.
If neem oil hasn’t fully dried before the sun rises and the day warms up, you run the risk of burning your plants because the oil will literally begin cooking the plant’s foliage.
I once sprayed a few tomato plants with neem oil first thing in the morning, right after the sun had cracked the horizon, and those plants still got burned that day. Because of that experience, I don’t take any chances anymore.
This is the primary reason why you should always apply neem oil in either the late afternoon or early evening.
I always wait as long as possible–while still having enough daylight to see what I’m doing–before I spray my plants neem oil because I’d prefer to err on the safe side and ensure that everything has dried before the sun rises the next day.
Assuming you’ve waited until early evening, don’t hesitate to spray your plant heavily. By the time I finish spraying a tomato plant, it’s usually dripping a bit with neem oil.
Obviously, you don’t want to give the plant a shower, but you want to make sure that neem oil covers all of its foliage. This is especially important if you’re dealing with small, highly destructive bugs like aphids or spider mites.
Step 10: Spray on Windless Days
This might go without saying, but I’ve made the mistake before, so I’ll go ahead and say it: Don’t spray on windy days.
The last thing you want is to have neem oil spray blown in your face, so only spray when it’s relatively windless. If you feel the need to spray on a somewhat windy day, be sure to spray downwind so that you don’t accidentally cover yourself in neem oil.
If you happen to get some on you, there’s no need to worry. Neem oil is relatively harmless to humans. However, it should never be ingested since that could require a trip to the emergency room.
If neem oil ever gets on you, simply go inside and wash off the affected areas, then you can get back to work.
Step 11: Spray Heavily from All Different Angles
Tomato plants have a lot of leaves, and if you’re not careful to spray all foliage, the bugs you’re trying to kill will be able to hide and avoid the neem oil.
When you’re ready to spray your tomato plants, I recommend starting at the bottom and spraying at an upward angle to ensure that you cover the undersides of all leaves in neem oil.
Work your way around the bottom of the plant, then move from bottom to top, all the while spraying at an upward angle to get the undersides of all foliage. Then do everything in reverse, spraying from top to bottom to cover the rest of the plant.
Step 12: Apply Leftover Mixture as a Soil Drench
I always overestimate how much neem oil spray I need, at least by a little bit, so that I don’t run out before I finish spraying my plants, which would mean spending extra time making more spray.
But this means that I usually have extra neem oil spray still left in my sprayer, even after I’ve thoroughly sprayed my plants.
Here’s what to do if you have leftover mean spray:
First, don’t throw it out. That spray can still be used and getting rid of it isjust wasting money.
Second, don’t attempt to store leftover neem oil spray. As I’ve noted in articles on how long neem oil lasts and how to make your neem oil more effective, neem oil begins to break down as soon as it’s diluted with water. If you attempt to store your neem oil spray for use at a later time, it’s not going to be very effective, and if you wait more than a few days, it won’t do much of anything at all.
What you should do instead with leftover name oil is to use it as a soil drench. If you’re doing this for the first time, I recommend adding additional water, probably a half gallon but maybe more depending on how much leftover neem oil you have, then pouring it around the base of one of your infested tomato plants.
Keep an eye on your plant, and if this treatment works well, you can try pouring the leftover neem oil spray next time without further diluting it.
Neem oil can work as a soil trench because the plant will absorb the neem oil’s chemical compounds along with the water and transport them throughout the plant. When an aphid, spider mite, or other destructive bug attacks the plant to siphon off its nutrients, they will siphon off the neem oil as well and experience its detrimental effects.
Step 13: Rinse Out Garden Sprayer
To be honest, I should probably rinse my sprayers out with water after every use, but I don’t.
I typically use my sprayer several times before rinsing it out. But rinsing out your sprayers, even if it’s just done every now and then, will ensure that they don’t get clogged with any of your sprays.
I have different sprayers for the different sprays that I use in my garden—one for neem oil, anither for soapy water, yet another for copper fungicide, etc.—but if I were using the same garden sprayer for different kinds of sprays, I would definitely rinse it out between each use
Step 14: Store Neem Oil in a Climate-Controlled Location
You should always store your name oil in a cool, climate-controlled indoor space. This will extend the life of your neem oil and ensure that it stays effective.
I store mine on the top shelf of my pantry. It’s dark in there, and it always stays relatively cool, so I keep the neem oil in a basket that I use for storing sensitive outdoor products.
Step 15: Harvest Veggies 5-7 Days After Application

As I’ve noted in my article on spraying neem oil before a harvest, I think it’s best to harvest tomatoes 5-7 days after you’ve sprayed your tomato plants
The name oil will have broken down by that time, so your veggies will be perfectly safe to eat.
But I still recommend giving them a good wash in a bowl of lukewarm soapy water. That way, you won’t have any neem oil residue on them when it’s time to eat.
Step 16: Re-Apply Neem Oil 4-7 Days After Application
As I noted above, neem oil rarely works after a single spray.
Unlike harsher chemical insecticides, it does not kill bugs on contact. It needs time to dry on the plant and be ingested by garden pests.
If you’ve got an infestation, I recommend at least two applications of neem oil spray, preferably 4-7 days apart.
But if you’ve got aggressive bugs like spider mites on your tomato plants, you’ll have to reapply neem oil 3 to 4 times over the course of several weeks in order to stop them in their tracks.
The reason for this is that tomato plants just have too many leaves. No matter how diligently you spray your plants with neem oil, you’re likely going to miss certain areas of the plant, and the pests hiding in those areas will continue reproducing.
Optional: Apply Soapy Water Sprays on Intervening Days
This is an optional step, but if your tomato plants are suffering from an extreme infestation, I recommend getting super aggressive when it comes to spraying them with homemade insecticidal treatments.
Imagine that you’re spraying your plants with neem oil once every 4 to 7 days. What I recommend doing is spraying your plants with a soapy water spray every single day in between neem oil sprays.
In other words, your treatment schedule would look something like this:
| Day | Treatment |
|---|---|
| Day 1 | Neem Oil |
| Days 2-5 | Soapy Water |
| Day 6 | Neem Oil |
| Days 7-10 | Soapy Water |
| Day 11 | Neem Oil |
| Days 12-15 | Soapy Water |
| Day 16 | Neem Oil |
I realize that this looks almost comically aggressive, but if you’ve ever lost plants to spider mites, you know how destructive they can be and how easily they can rebound from all attempts to kill them.
To make a strong soapy water spray, simply mix 4 tablespoons of organic liquid soap per gallon of water, then spray your plants following the instructions I noted above. That’ll do the trick!
Optional: Harvest Veggies 1-4 Days After Application
When you use insecticidal treatments in your garden, you’ll need to play close attention to what’s known as the pre-harvest interval (PHI) rate that’s located on most bottles
The PHI rate is the number of days you must wait after applying an insecticidal product before you can harvest and eat your vegetables.
The stronger the chemicals, the longer the interval.
As I suggested earlier, I think it’s best to harvest vegetables 5-7 days after you’ve applied neem oil. But in a pinch, you can harvest vegetables 1-4 days after spraying them with neem oil if you really need to do so.
In such a scenario, you must wash your vegetables very, very well.
Fill up a bowl with room temperature soapy water, then let your vegetables soak in that bowl for 10-15 minutes. After that, rinse each vegetable with tap water while scrubbing gently with a clean sponge or towel.
Final Consideration
One final thing to keep in mind: Your tomato plants have natural defenses against invasive bugs, but the plants need to be healthy for those defenses to work properly.
Maintain a good fertilization schedule throughout the growing season. There are many different approaches you can take, but one of the simplest is to apply a fish emulsion fertilizer once every two weeks at the base of your tomato plants.
First, purchase a quality fish emulsion product. Second, mix 2 tablespoons of fish emulsion per gallon of water. Third, pour the mixture at the base of each plant.
Unlike some fertilizers, this one won’t burn your tomato plants, so you can use it without worry.
Further Reading
My goal with this article was to share everything I know about using neem oil on tomato plants so that you can nurture healthy, productive plants this year.
But obviously, the more you know about garden pests, the more you’ll be able to fight them off.
If you’d like to learn more neem oil or gain additional insights into two of the most destructive garden pests out there, take a look at these articles: